Which part of the plugin do you need help with?
Animated Text
For a general overview of how to use Callouts, click the Tutorial button in the Viewer in Final Cut Pro X.
The Animated Text title effect is not strictly a Callout, and many of the other Callouts include a text component, but in using Callouts, I often found I wanted to add more text, or have text come on-screen at a different time than the Callout. While Final Cut Pro X comes with a large number of titles already, I’ve included a simple animated text title with this collection so you don’t have to go hunting around to find something when you just want some simple text to add to a Callout.

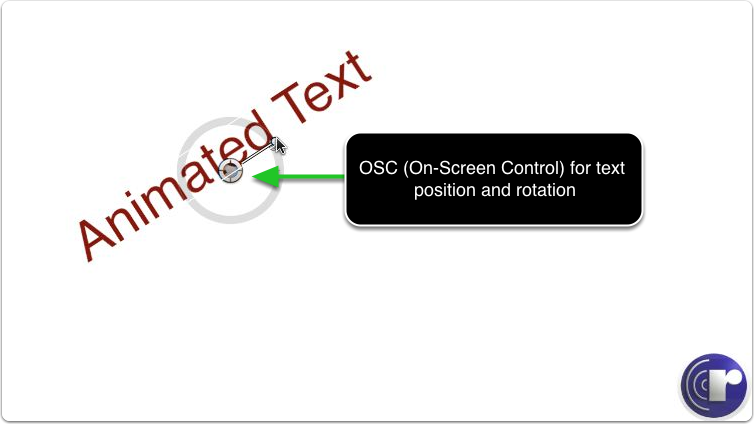
On-Screen Controls
When editing text (by double-clicking), you can also move (but not rotate) the text with the control point…
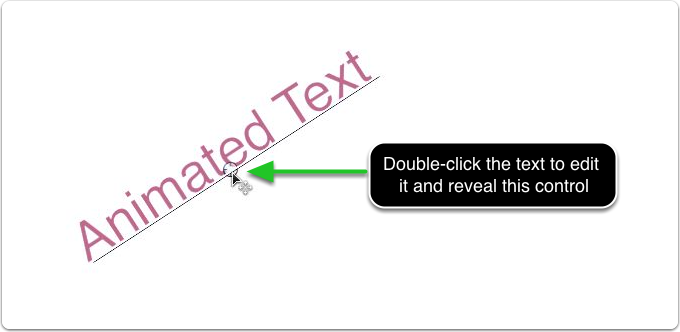
But doing this will not affect the location of the OSC, so I recommend just using the OSC to move the text.

Published Parameters
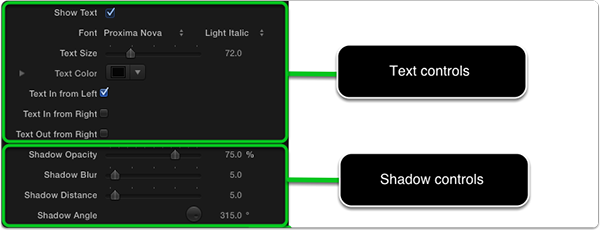
Everything in the Title tab of the Inspector should be self-explanatory. The text parameters like Font, Size, Color and drop shadow options are repeated in the Text tab and I’ve put them here so you don’t need to jump between tabs – but if you want more options, like changing alignment or adding an outline or glow, then click the Text tab.
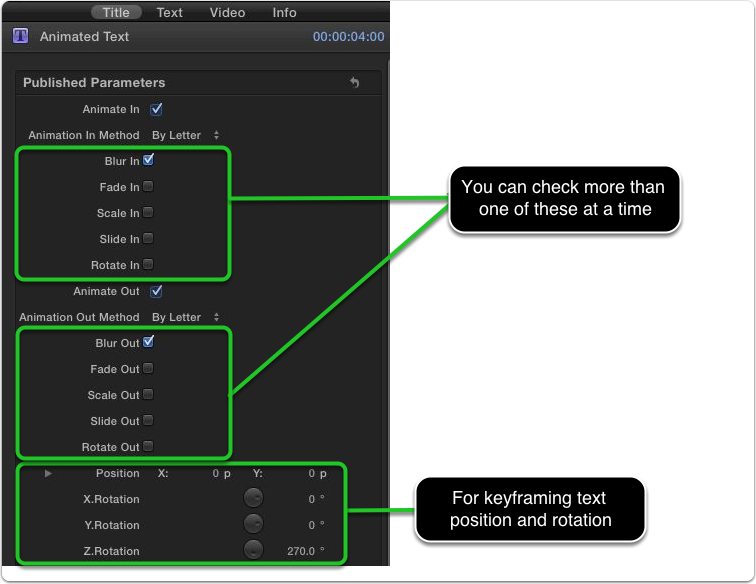
Published Parameters continued

Variations
By choosing Edit > Special Characters after you have double-clicked the text to edit it, you can add all kinds of interesting symbols available from the Character Palette.

Connect Direct
For a general overview of how to use Callouts, click the Tutorial button in the Viewer in Final Cut Pro X.
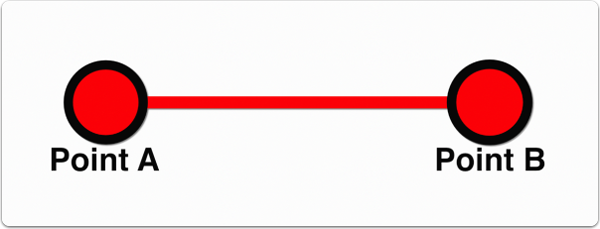
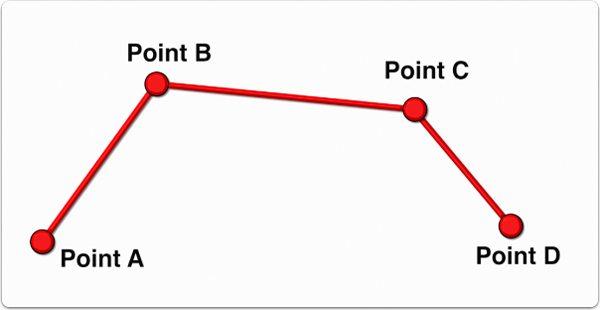
This Callout is just like Connect the Dots, but only creates straight lines.
On-Screen Controls
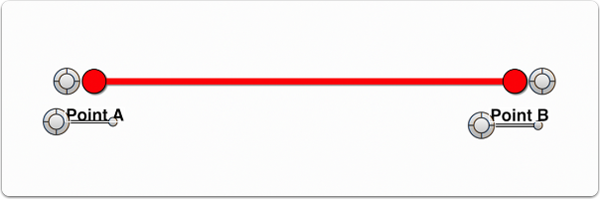
Four OSC’s: for each endpoint, and one for each line of text.
TIPS:
- The text moves with each end OSC, but can also be moved independently
- Click the Reset arrow twice to reset the line and endpoints. The text will reset.
- Combine multiple copies of the title effect by stacking them and offsetting them to add more animated lines and end points. You can turn off Point A or Point B so you don’t have to hide one under the other.
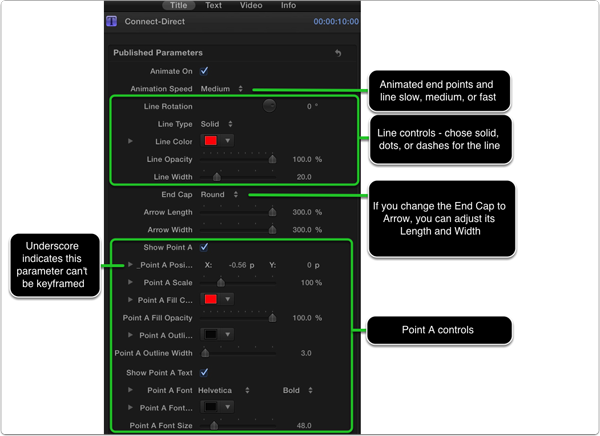
Published Parameters
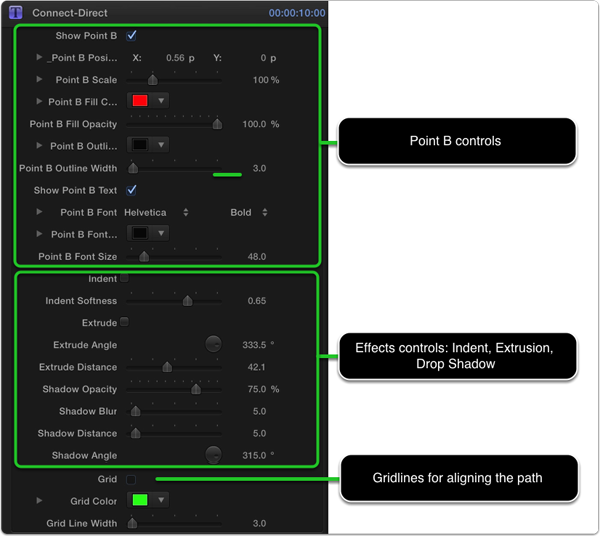
Published Parameters Continued
Variations
Scaled endpoints, Dotted connection line, Indent applied
Variations
Three copies stacked, second points turned off
Arrow
For a general overview of how to use Callouts, click the Tutorial button in the Viewer in Final Cut Pro X.
Here are some tips for using the Arrow callout.
![]()
Arrow On-Screen Controls
We’ve given you a lot of control over the look of the arrow in the form of 5 on-screen controls (OSCs). Simply drag them to see what they do.
![]()
Moving Text
You can move and rotate the text independent of the arrow. For best results, move and rotate the arrow with the text first, then move and rotate the text.
![]()
Arrow Published Parameters
You can change the look of the arrow with the parameter controls in the Title Inspector. While basic properties like position, rotation, and scale can be animated with keyframes in Final Cut Pro X, the shape control points of the arrow cannot be animated – these parameter names are preceded with an underscore. For example, you can set keyframes for “Neck Scale” in the Inspector, but they will have no affect on the arrow.
![]()
Arrow Published Parameters – continued
![]()
Arrow Variations
The Arrow parameter controls give you a lot of options for creating different looks. Here’s an example of an arrow whose tip width was made smaller than the arrow shaft. The arrow’s roundness was also increased; the indent checked, and a low softness value applied.
![]()
Box Center Point
For a general overview of how to use Callouts, click the Tutorial button in the Viewer in Final Cut Pro X.
The Box Center Point Callout is quite simple. It creates a box with a pointer and text inside. You can place the pointer along the center of any edge and modify the shape and color of the box.
It includes one On-Screen Control to change the position of the box.

Parameters
On-Screen Controls Continued
Variations
Some ideas for modifying the default look of the Callout.
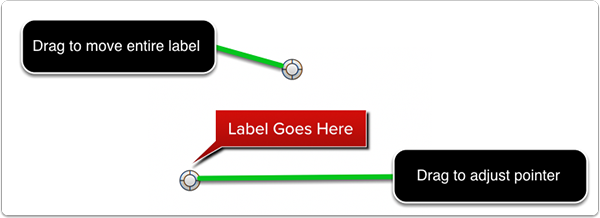
Box Corner Point
For a general overview of how to use Callouts, click the Tutorial button in the Viewer in Final Cut Pro X.
The Box Corner Point callout is quite simple. It creates a box with a pointer and text inside. You can place the pointer along the center of any edge and modify the shape and color of the box.
It includes two On-Screen Controls: one to move the entire label, and one to move the pointer.
Parameters

Variations
Some ideas for modifying the default look of the Callout.
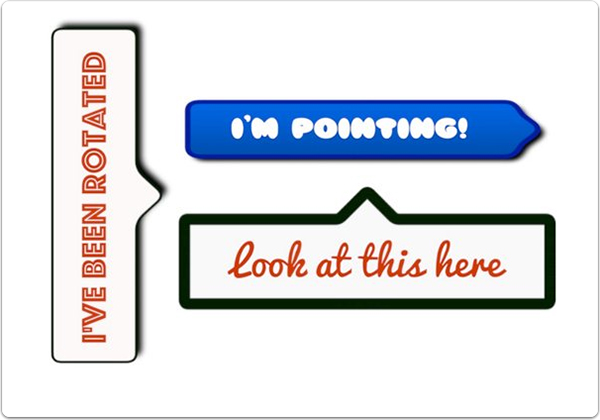
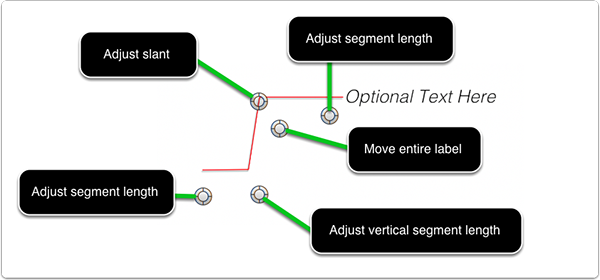
Bracket Angle
For a general overview of how to use Callouts, click the Tutorial button in the Viewer in Final Cut Pro X.
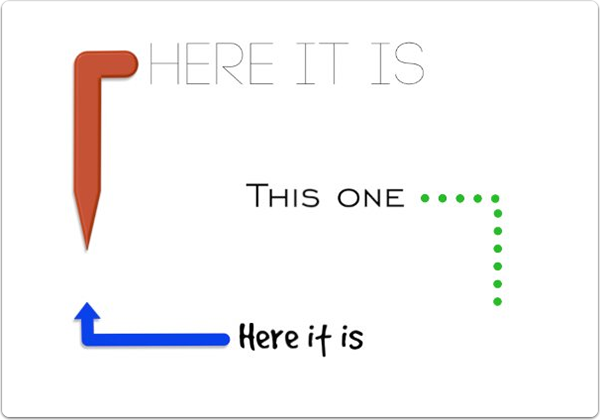
The Bracket Angle Callout is a 3-segment line and text. It is very flexible.
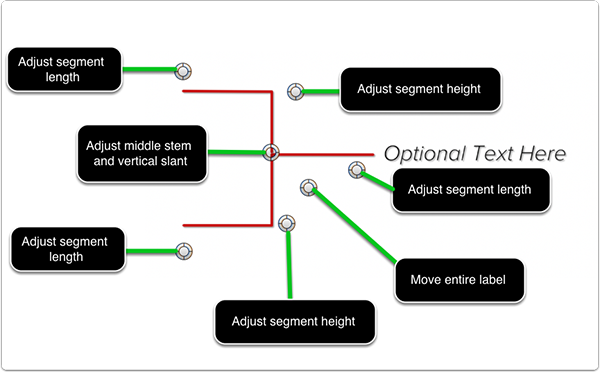
It includes five On-Screen Controls: one to move the entire Callout (line & text), 3 to control the length of the three segments, and one to control the slant of the vertical segment.
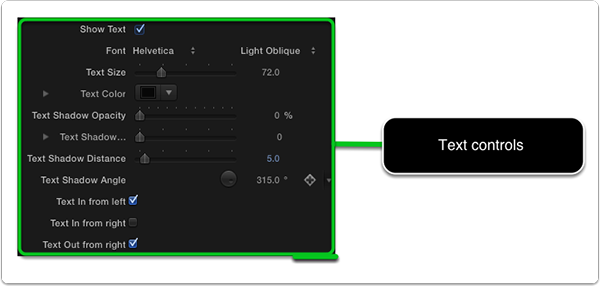
Parameters
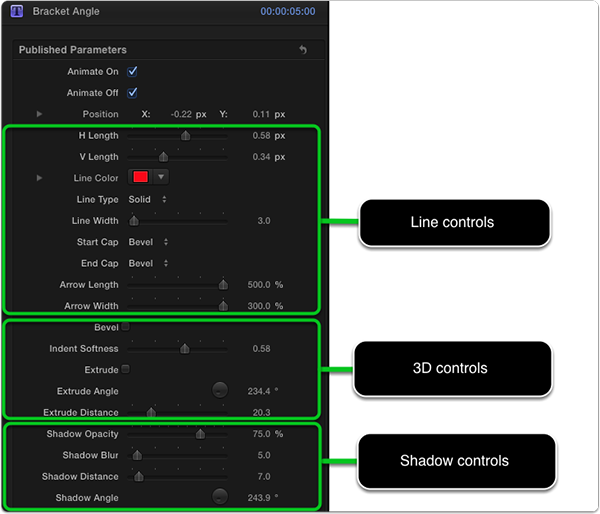
Parameters
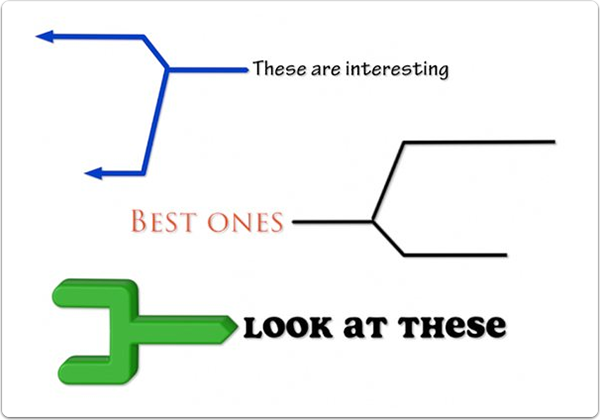
Variations
Some ideas for modifying the default look of the Callout.

Bracket Double
For the general overview of how to use the Callouts, click the Tutorial button. The Bracket Double callout is a 5-segment line and text. It is very flexible.
It includes 7 On-Screen Controls: one to move the entire Callout (line & text); 3 to control the length of the three horizontal segments; 2 to control the length of the two vertical segments, and one that controls both the slant of the vertical segments and the vertical position of the middle horizontal line that points to the text. Just drag them to see how they work.
Parameters
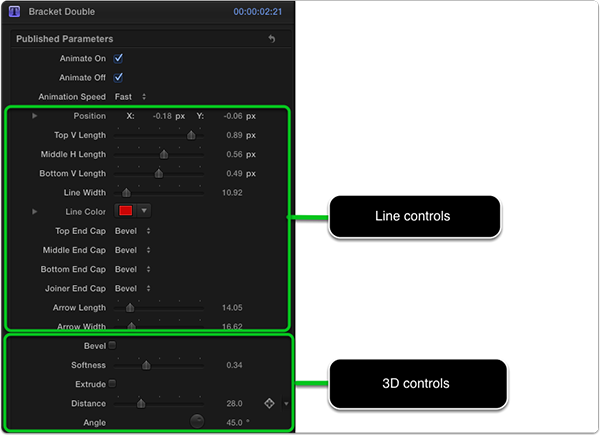
Parameters
Variations
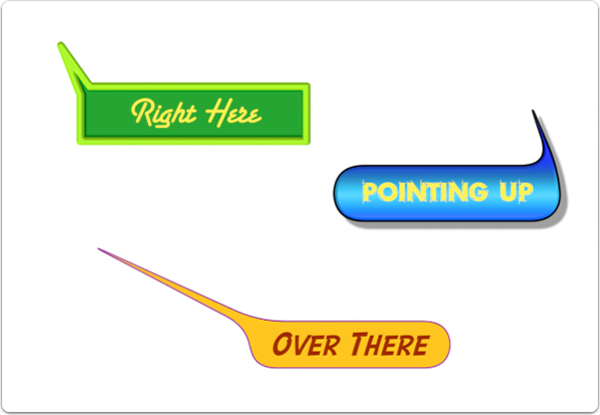
Bracket Simple
For a general overview of how to use Callouts, click the Tutorial button in the Viewer in Final Cut Pro X. The Bracket Simple Callout is a 2-segment line and text.
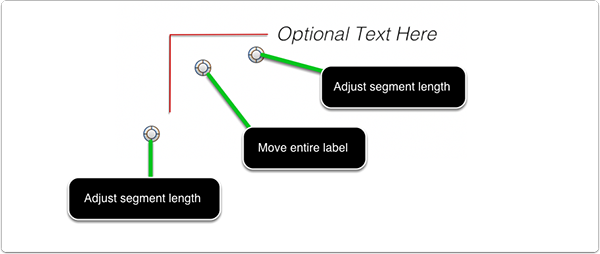
It includes 3 On-Screen Controls: one to move the entire Callout (line & text), and one to control the lengths of each of the two line segments.
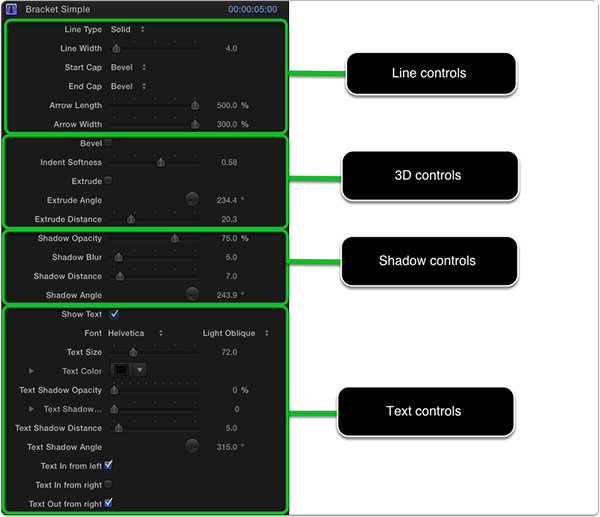
Parameters
Variations
Some ideas for modifying the default look of the Callout.
Bubbles
For a general overview of how to use Callouts, click the Tutorial button in the Viewer in Final Cut Pro X.
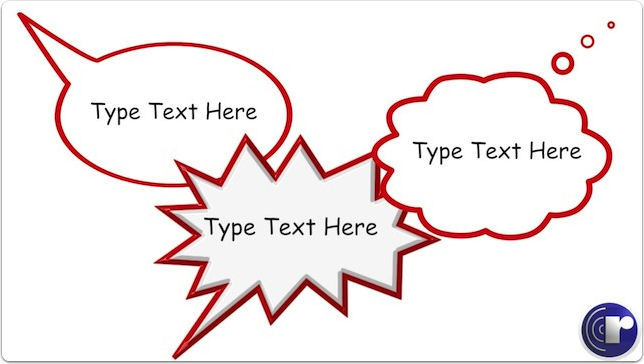
Bubbles are great for showing what someone (or something) is saying, thinking, or even shouting. Like all callouts, they work best on a still image or a hold frame of a video clip.
On-Screen Controls
2 OSC’s for moving/rotating a bubble and then adjusting the “extender” position. All three bubble types work the same way.
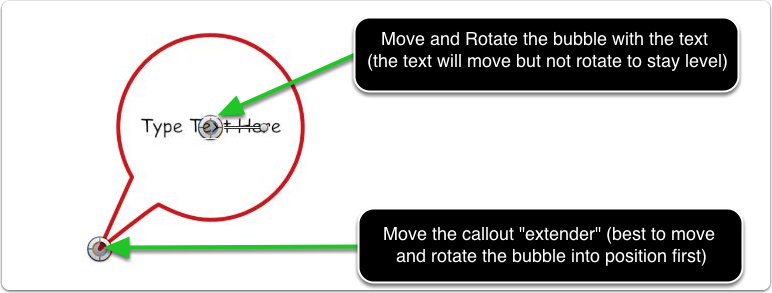
Moving the Text
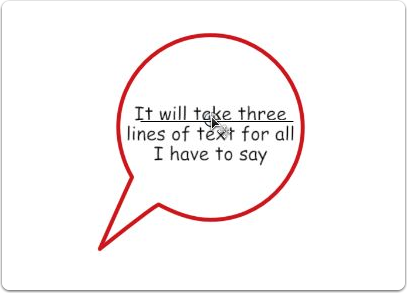
To adjust the position of the text within the bubble (or to move it outside the bubble if you want) you need to double-click it to enter text edit mode, then drag the dot.
Manipulating the Drop Zone
The position and scale of the Drop Zone content can by adjusted directly in the Viewer by double-clicking, or by using the parameters in the Title Inspector. If you use the Viewer controls, deselect the title to exit the editor.

Published Parameters

Variations
Bubble Type is Shout, with a thick Outline Width and Indent enabled.

Callout-Arrow
For a general overview of how to use Callouts, click the Tutorial button in the Viewer in Final Cut Pro X.
The Callout-Arrow title effect is one of the most versatile tools in the collection and is very easy to use.
![]()
On-Screen Controls
There are 5 OSC’s here – I know, it seems like a lot, but they let you modify the arrow and text locations very quickly. Best to move and rotate the text last. Also, you could move the text while in text edit mode, but it’s better to use the OSC in order to keep it with the text.
![]()
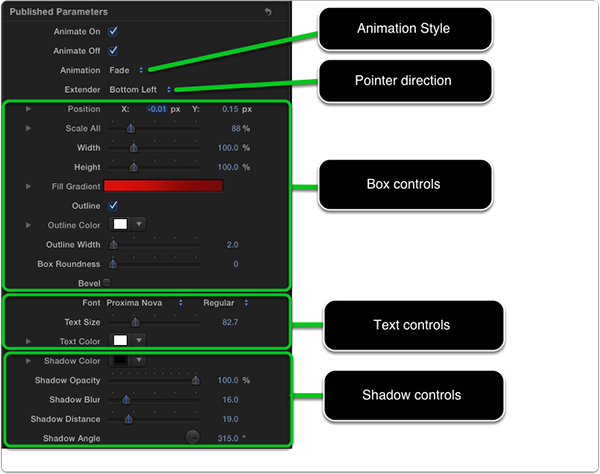
Published Parameters
![]()
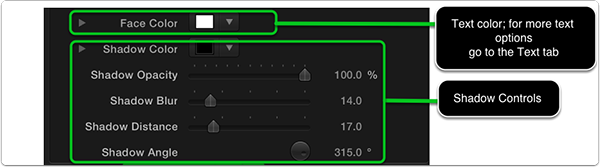
Published Parameters continued
![]()
Variations
Narrow arrow tip, round start, Indent and Extrude enabled
![]()
Callout Square
For a general overview of how to use Callouts, click the Tutorial button in the Viewer in Final Cut Pro X.
The Callout Square title effect works much like Callout Circle, but with a rectangle that you can manipulate to frame an object.

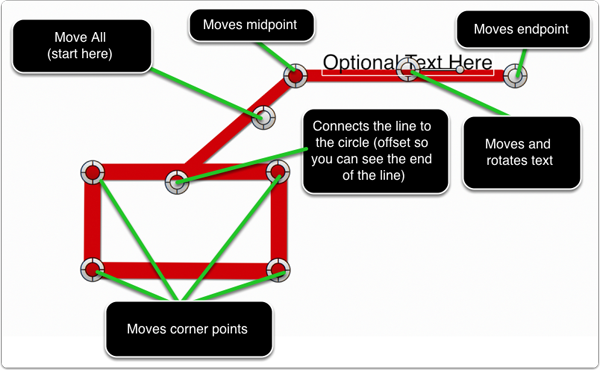
On-Screen Controls
9 OSC’s for quickly adjusting the callout. Start with the “Move All” OSC. The rectangle can be moved independently of the line for maximum flexibility, but you do have to manually “reconnect” the line to the rectangle.
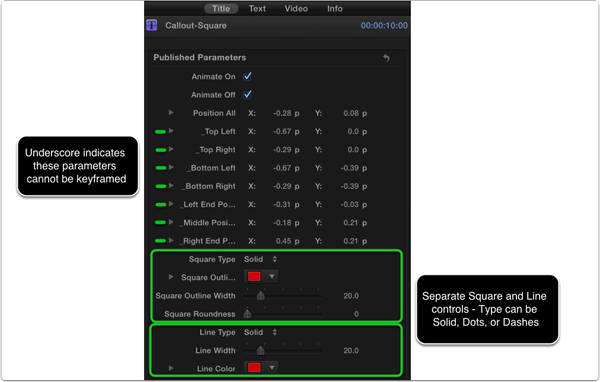
Published Parameters
Big Tip: Once you change the Circle or line Type to Dots or Dashes, you can no longer use the OSC’s to move them. So get them in position first, then change the type if you want dots or dashes.
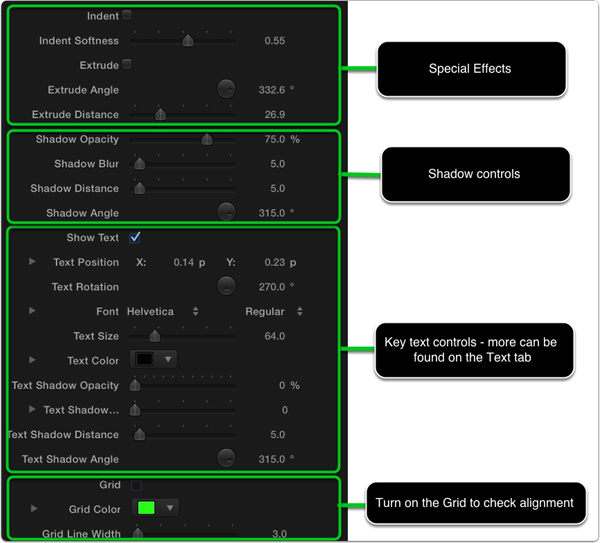
Published Parameters Continued
Variations
With Indent and Extrude enabled. With Dashes, adjust the line width if you don’t like how they break at the corner point.

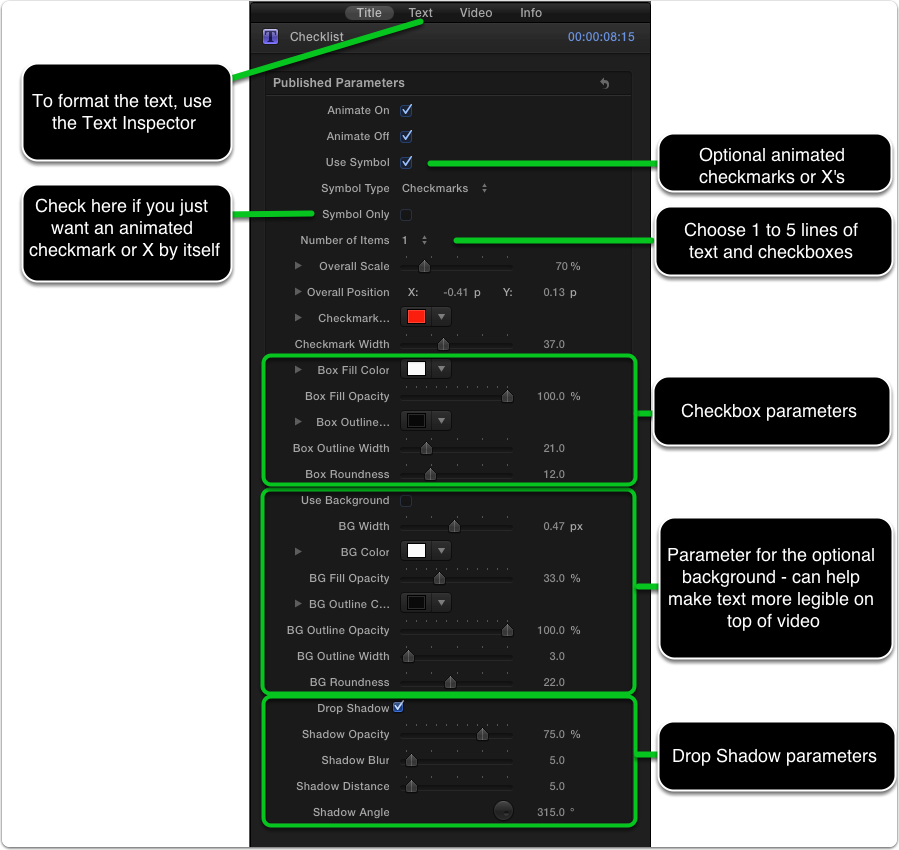
Checklist Callout
For a general overview of how to use Callouts, click the Tutorial button in the Viewer in Final Cut Pro X.
The Checklist Callout lets you add create a list of 1 to 5 lines of text, each with a rounded check-box with an optional animated check-mark or X.

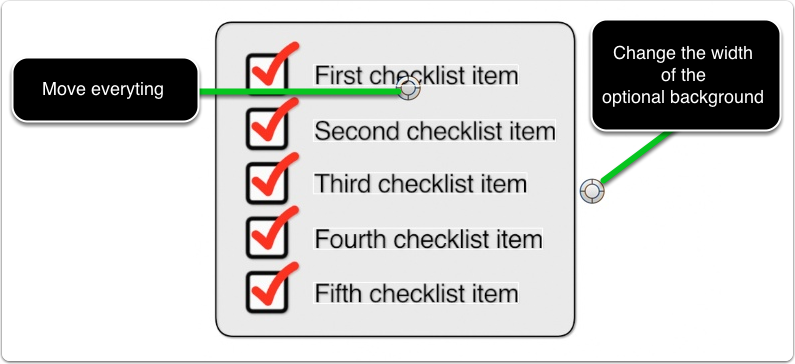
On-Screen Controls
Three OSCs: one in the center to move & rotate the Callout and text together (the text will move but not rotate); one to move and rotate just the text; and one to change the scale of the shape.
On-Screen Controls
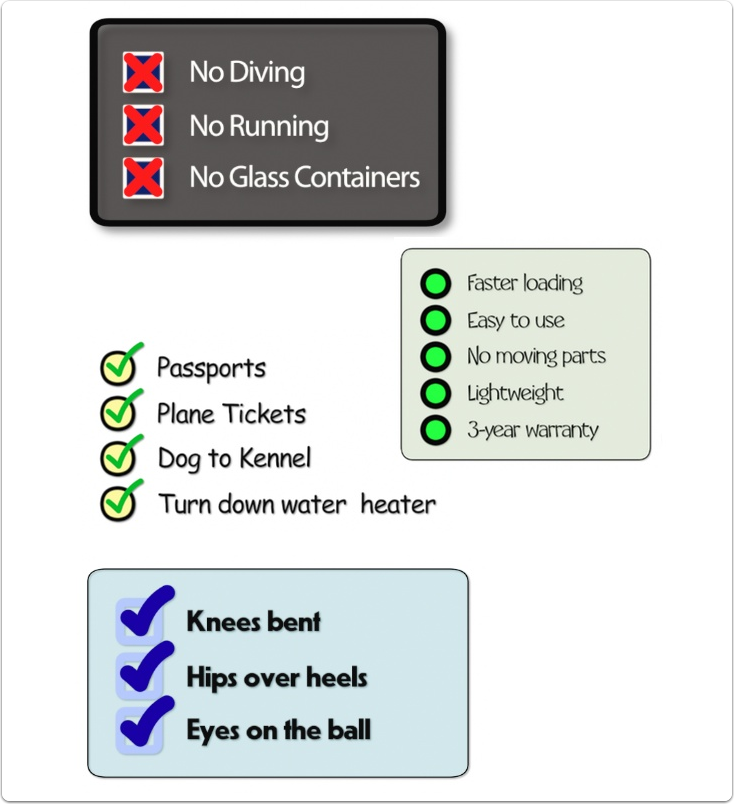
Variations
Some ideas for modifying the default look of the Checklist Callout.
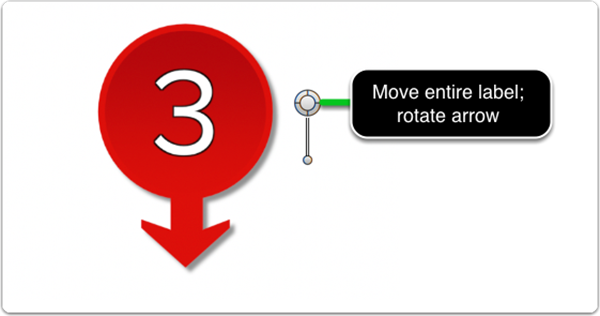
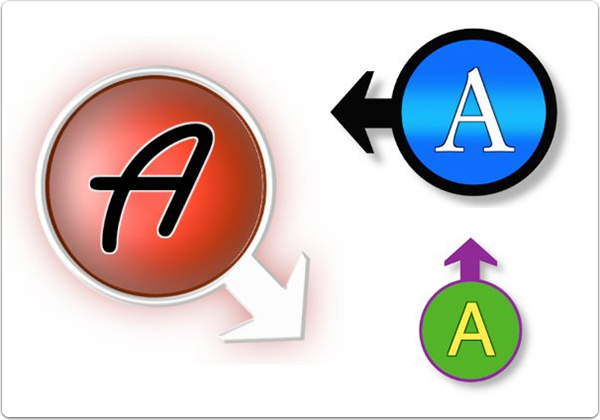
Circle Numbers
For a general overview of how to use Callouts, click the Tutorial button in the Viewer in Final Cut Pro X. The Circle Numbers Callout is circle shape with an arrow, and a text layer inside.
It includes a single on-screen control for moving the Callout and rotating the arrow.
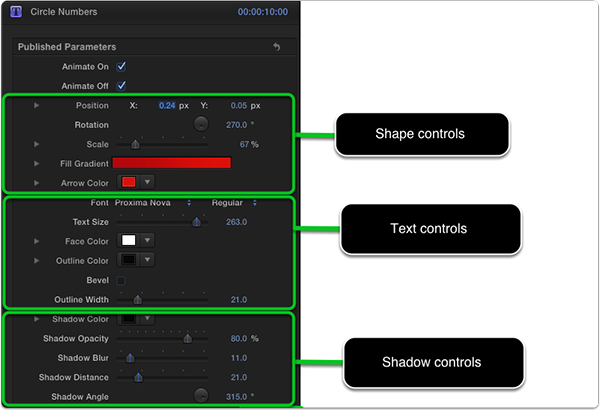
Parameters
Variations
Some ideas for modifying the default look of the Callouts.
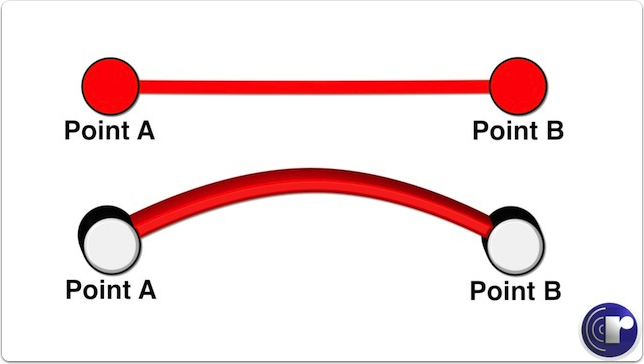
Connect the Dots
For a general overview of how to use Callouts, click the Tutorial button in the Viewer in Final Cut Pro X.
This Callout is great for creating an animated path between two points. You can curve the path, and add more points by duplicating and offsetting the title effect.
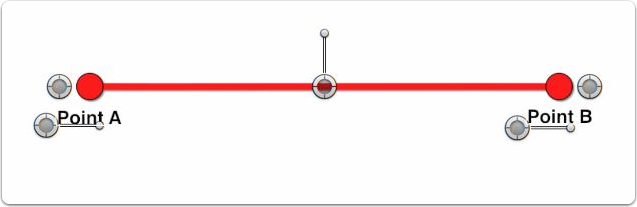
On-Screen Controls
Five OSCs: for each endpoint; one in the middle to rotate the entire path; (or move JUST the middle); and one for each line of text.
TIPS:
- If you want a straight path on an angle (not horizontal), then ROTATE the path to the angle you want first.
- The text moves with the end OSCs, but not with the middle OSCs. Just drag the OSC to move the text.
- If you click the Reset arrow, click on each OSC to complete the reset.
Combine multiple copies of the title effect by stacking them and offsetting them to add more animated lines and end points. You can turn off Point A or Point B so you don’t have to hide one under the other.
If you move an end point, the text will move with it
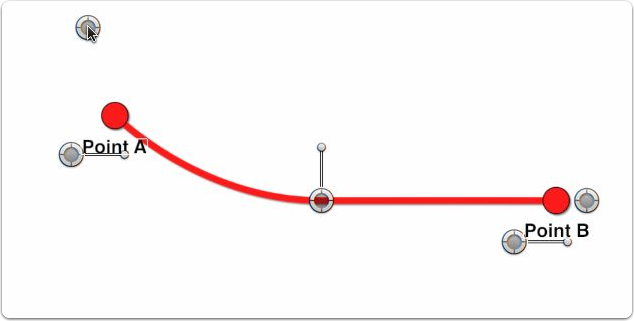
You can then tweak the text position by using its on-screen control
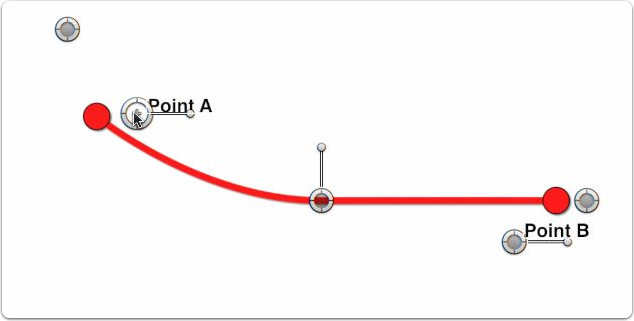
If you rotate the line, the text will not move with the end points – just use the Text OSCs to move it

Published Parameters
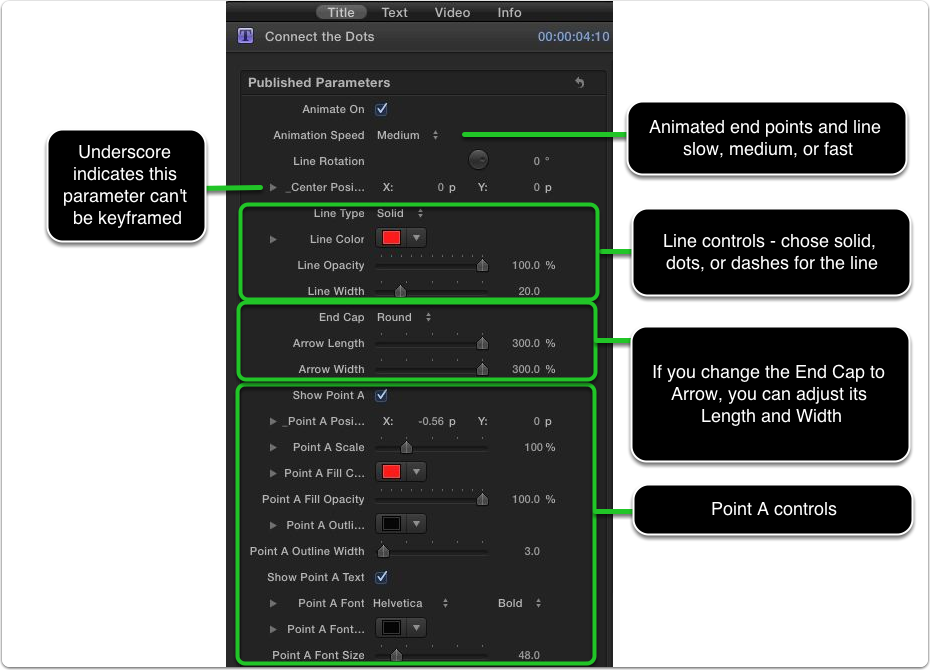
Published Parameters continued

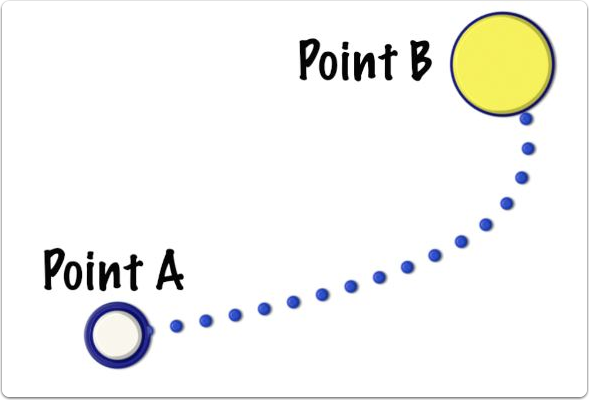
Variations
Scaled end points, dotted connecting line, indent applied.
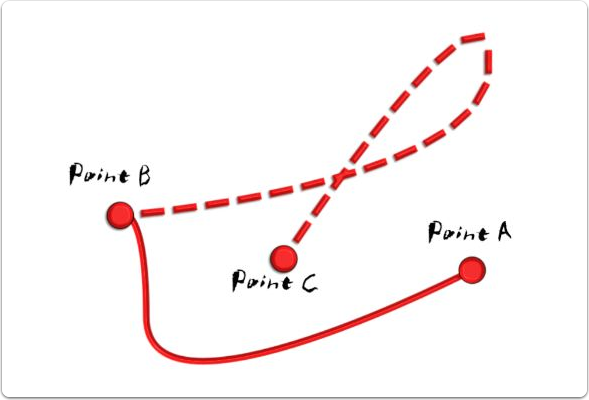
Variations
Two copies stacked, one with dashed lines, indent applied
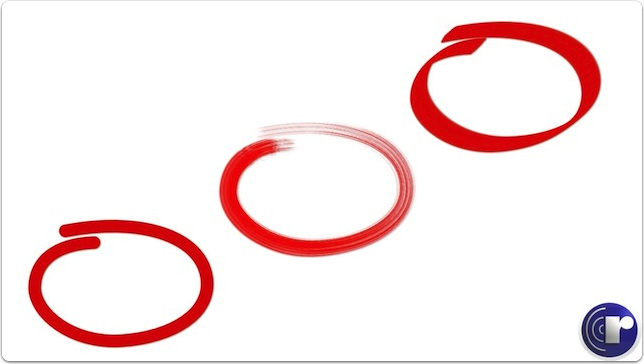
Encircle
For a general overview of how to use Callouts, click the Tutorial button in the Viewer in Final Cut Pro X.
Encircle is great for simulating someone drawing a rough circle around an object. You have 6 different textures to choose from, and you can even distort the effect to corner-pin to a stationary object that you want to highlight.
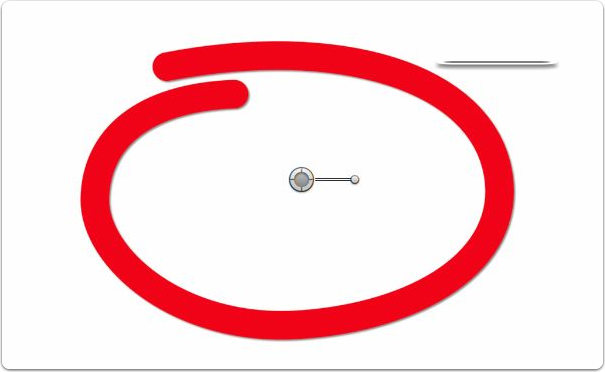
On-Screen Controls
One simple OSC for this Callout to move and rotate it into position.
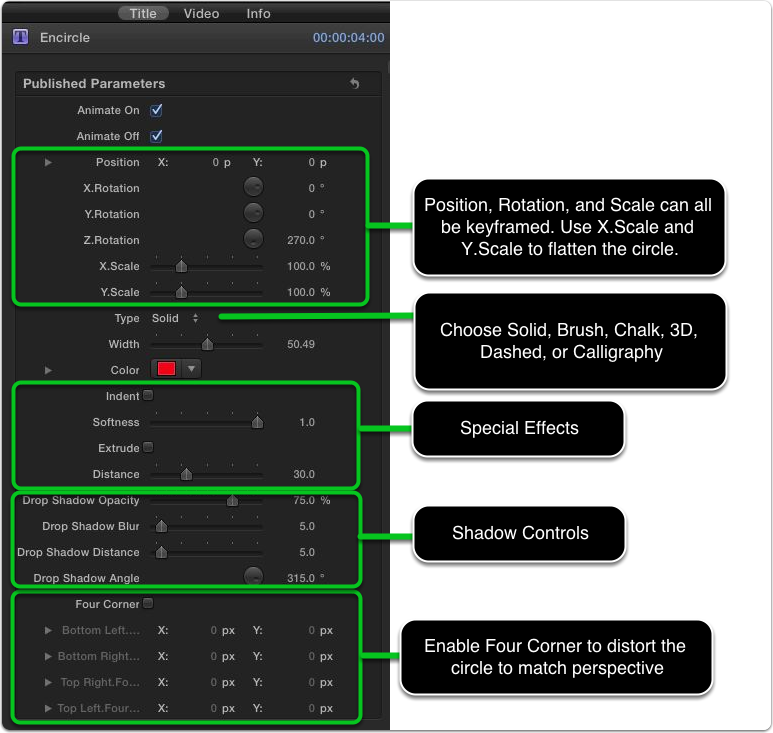
Published Parameters
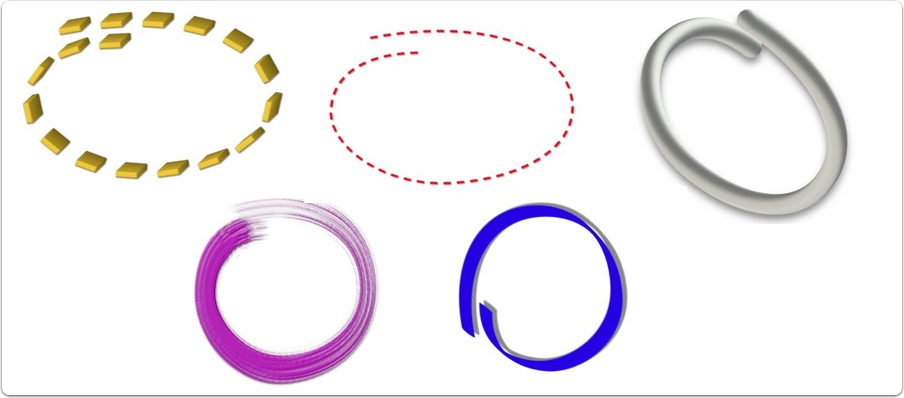
Variations
Some different ways to modify the Callout by changing the Type, Color, using Indent or Extrude, and adjusting the Drop Shadow parameters.
Glossy Shapes
For a general overview of how to use Callouts, click the Tutorial button in the Viewer in Final Cut Pro X.
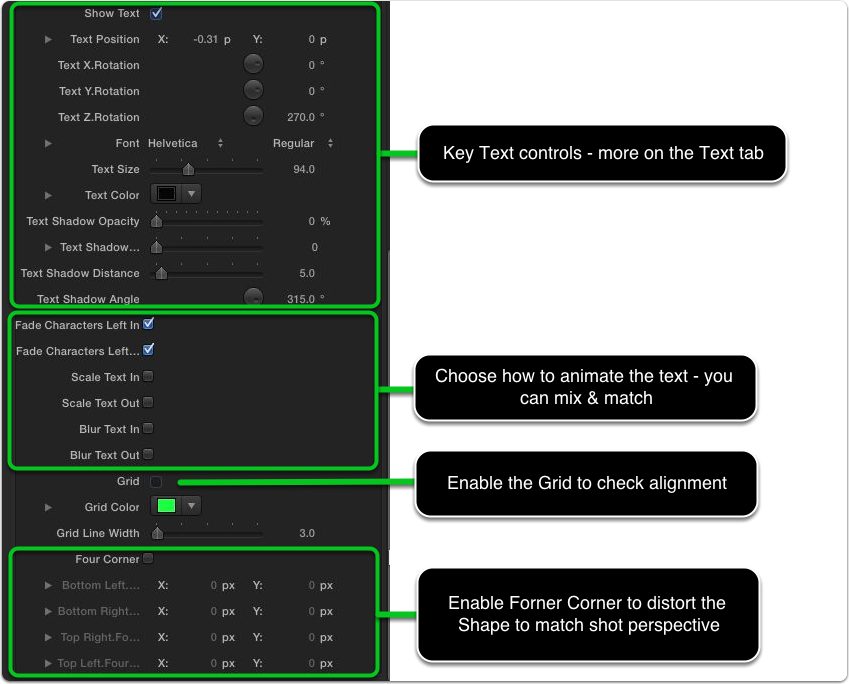
The Glossy Shapes Callout lets you add a variety of shapes to your video which you can use to callout an object, frame a drop zone, or act as a graphic design background for a title. Each shape includes text.

On-Screen Controls
Three OSCs: one in the center to move & rotate the Callout and text together (the text will move but not rotate); one to move and rotate just the text; and one to change the scale of the shape.
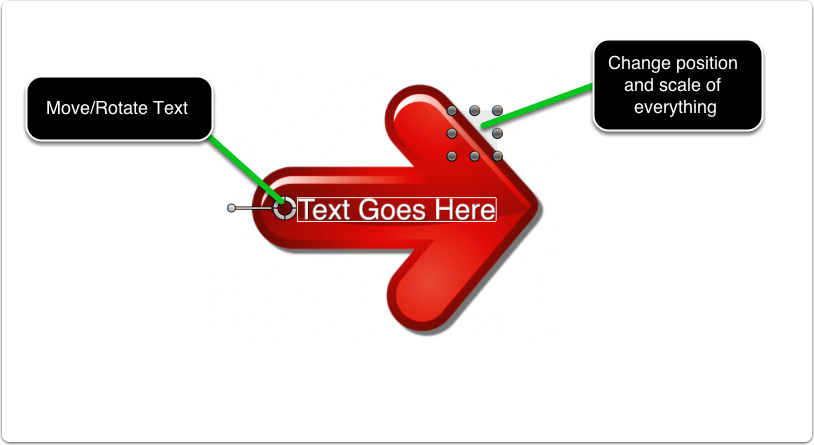
On-Screen Controls
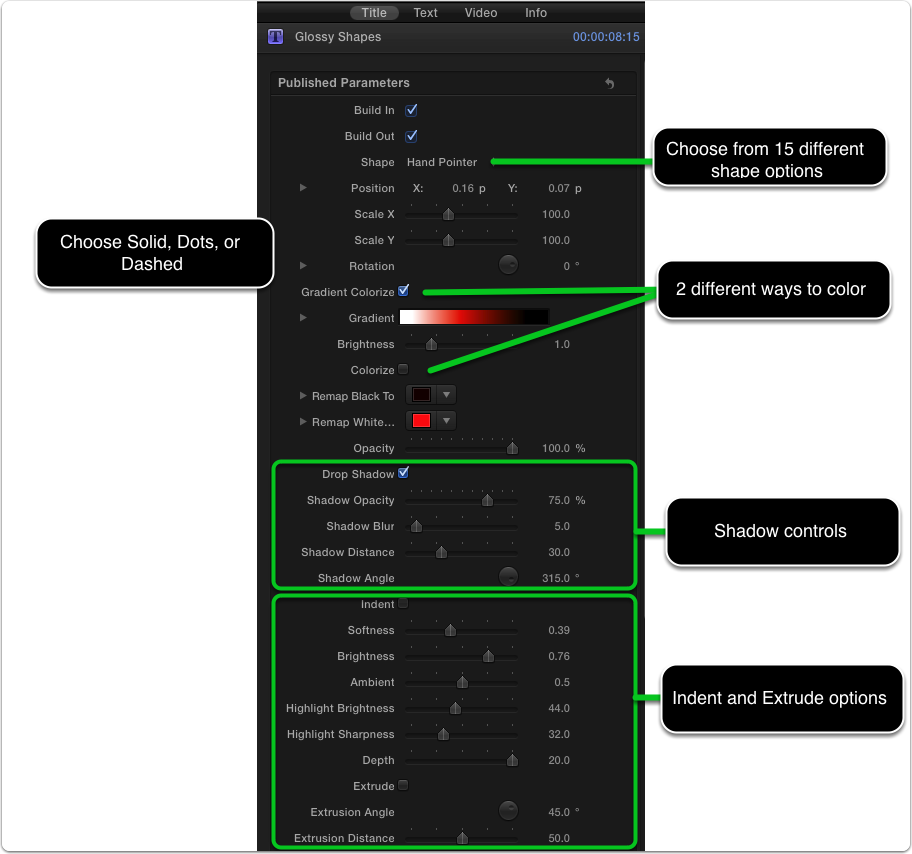
On-Screen Controls Continued
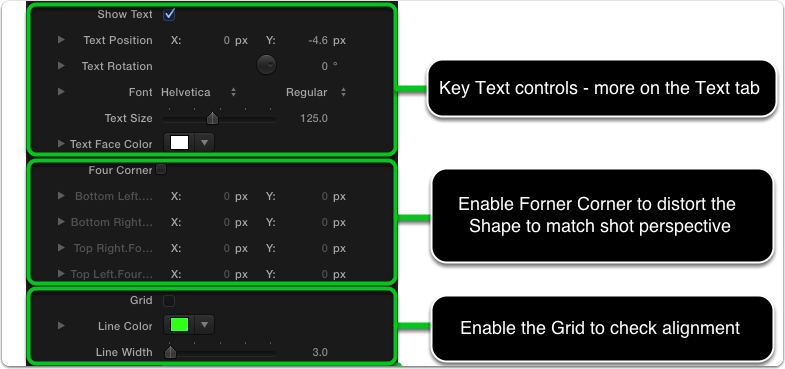
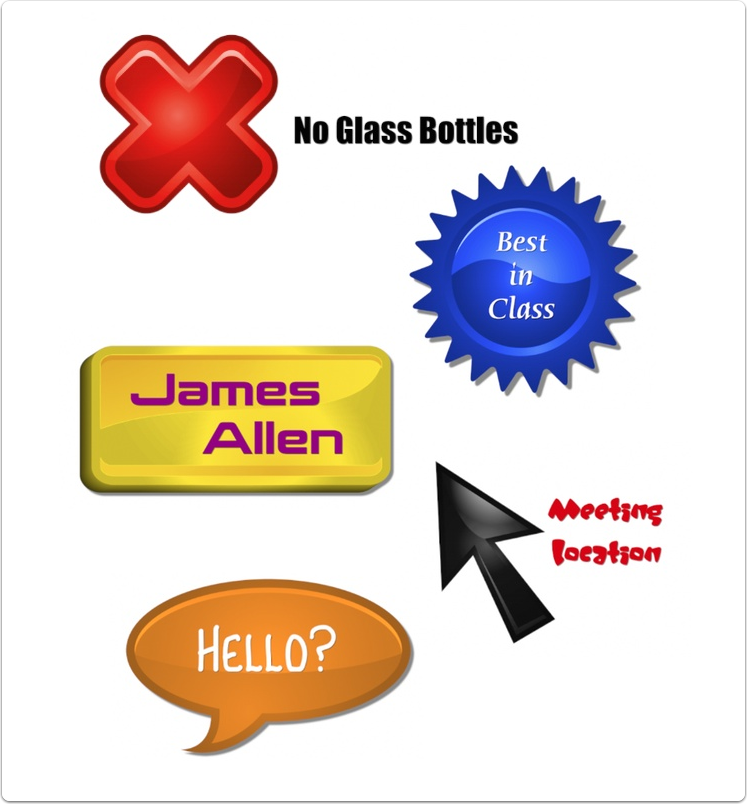
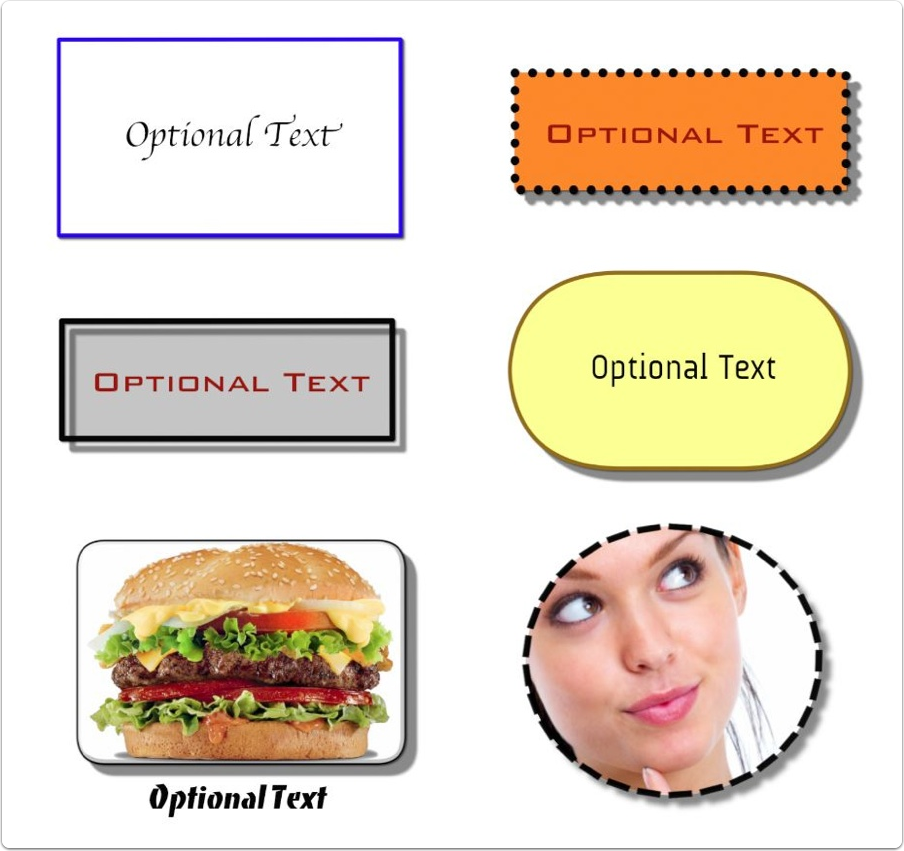
Variations
Some ideas for modifying the default look of the Shapes Callout. Have fun with this one!
Variations – Corner Pinning
An example of a rounded rectangle shape with 4-Corner enabled and adjusted to match scene perspective.

Info Label
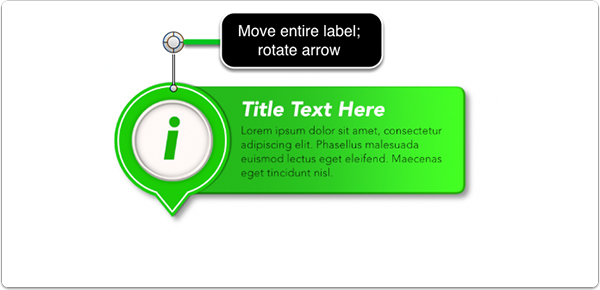
For a general overview of how to use Callouts, click the Tutorial button in the Viewer in Final Cut Pro X. The Info Label Callout includes both a circle with a text layer as well as a panel with a title and text body.
It includes a single on-screen control for moving the Callout and rotating the arrow.
Parameters
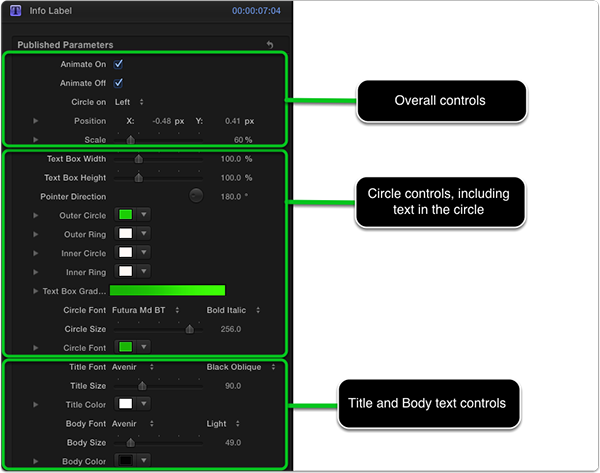
Parameters

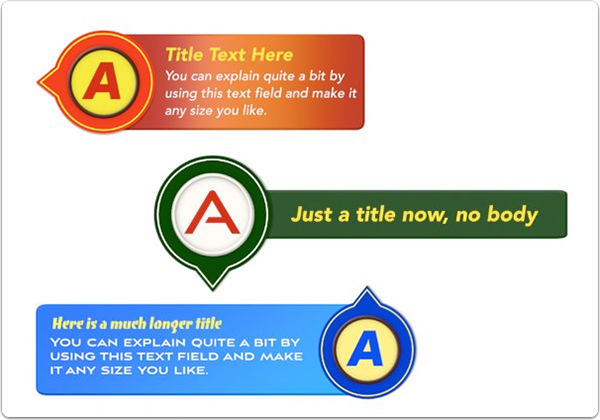
Variations
Some ideas for modifying the default look of the Callouts.
Magnify
For a general overview of how to use Callouts, click the Tutorial button in the Viewer in Final Cut Pro X.
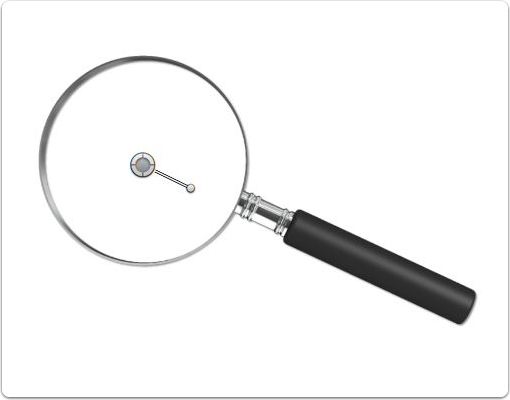
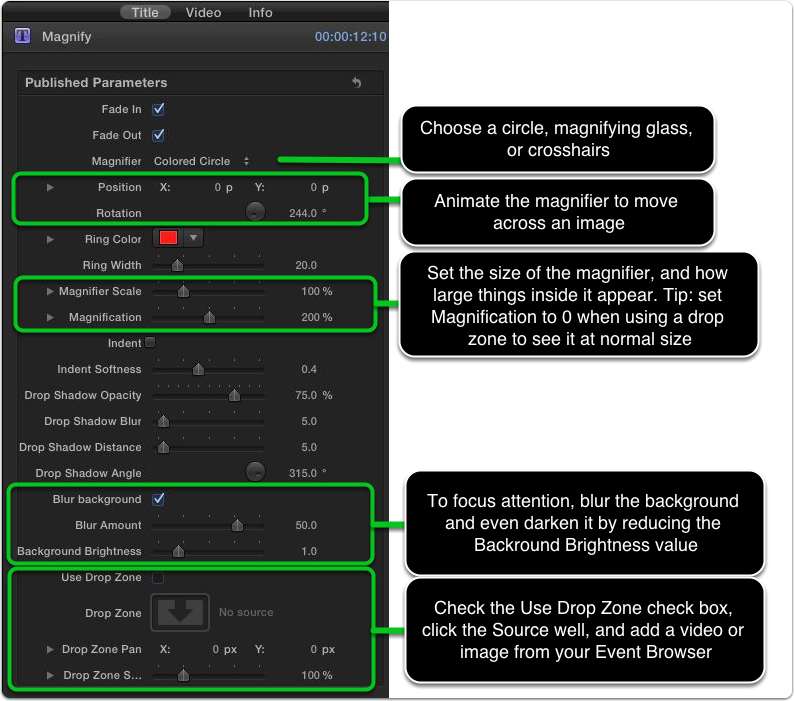
The Magnify Callout has a lot of options, from a simple circle to a full-blown magnifying glass. You can even replace the contents being magnified with a drop zone.

On-Screen Controls
One simple OSC to move and rotate the Callout.
Published Parameters
Variation 1
Cross-hairs with a blurred background.

Variation 2
Large Colored Circle with a thick line, high magnification, and blurred background.

Variation 3
Small Colored Circle with a thin line, low magnification, and blurred background.

Variation 4
Small magnifying glass with a darkened background.

Mouse Pointers
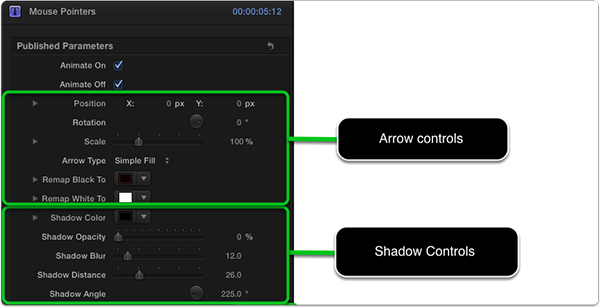
For a general overview of how to use Callouts, click the Tutorial button in the Viewer in Final Cut Pro X. The Mouse Pointers Callout includes several different pointer designs you can choose from.
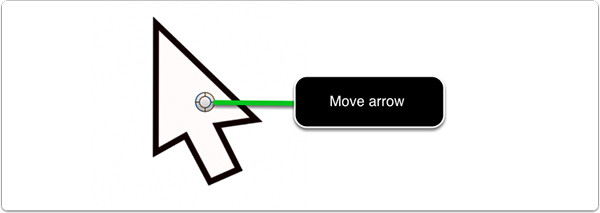
It has a single on-screen control for changing its position.
To animate its position and scale, you set keyframes in the Inspector.
Parameters
Variations
Some ideas for modifying the default look of the Callouts.

Pointer
For a general overview of how to use Callouts, click the Tutorial button in the Viewer in Final Cut Pro X.
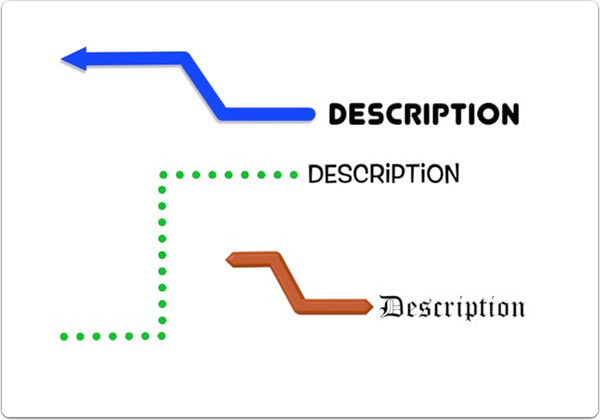
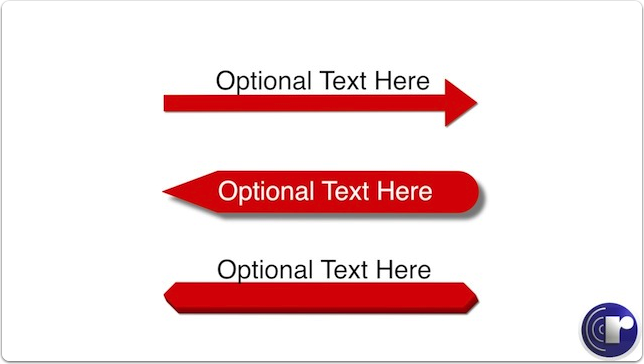
The Pointer Callout can be used as an animated arrow, an underline, a highlight, and more.
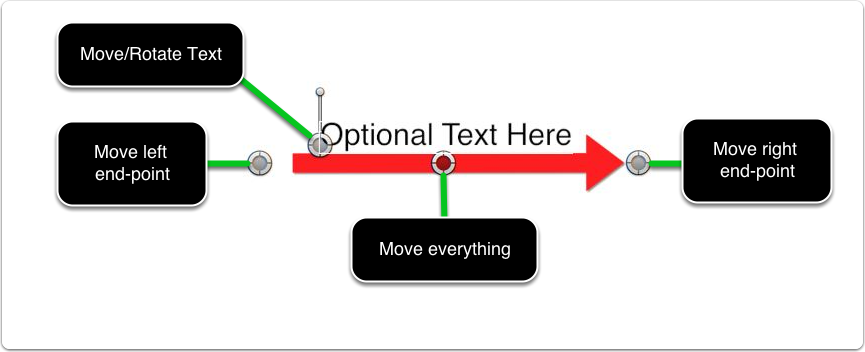
On-Screen Controls
OSCs for moving the entire Callout along with the text, the left and right endpoints, or the text alone.
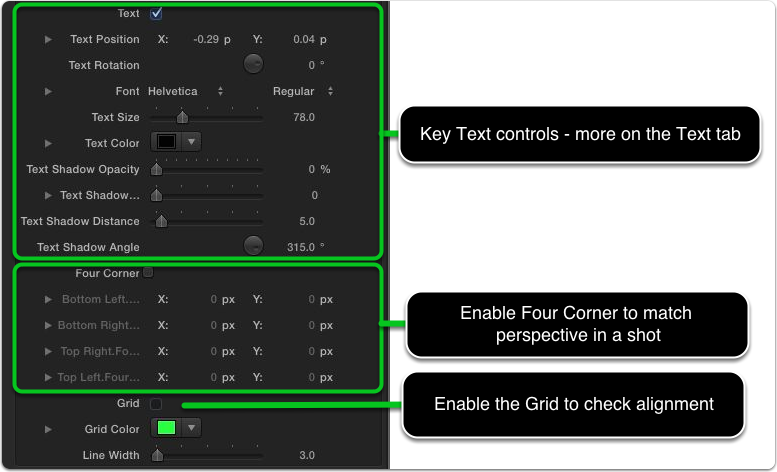
Published Parameters
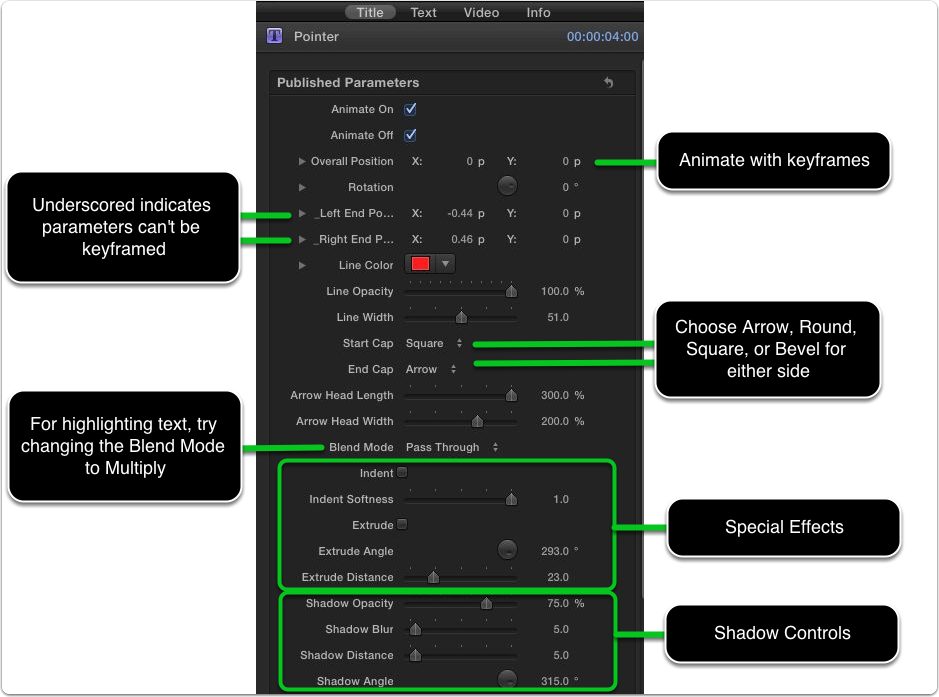
Published Parameters Continued
Variations
Some ideas for modifying the default look of the Pointer Callout by changing the End Caps, Width, Color, Arrow Head Length & Width, and using the Indent and Extrude effects. Note for the red highlight over the black text, the Multiply Blend mode was used to reveal the text under the color.

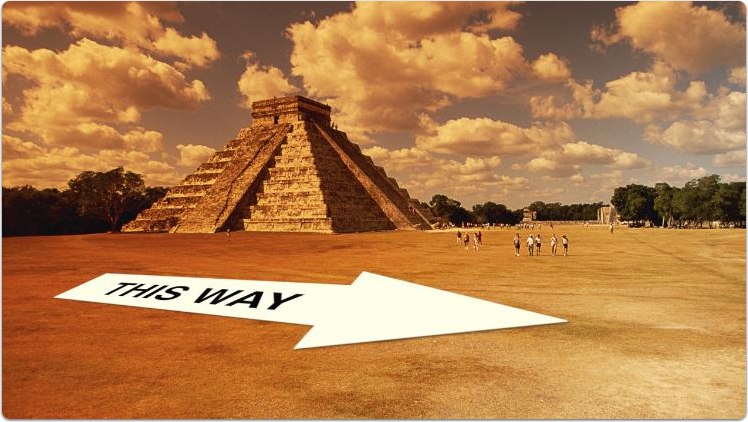
Variations – Corner Pinning
An example of using the 4-Corner parameters to match the perspective of the Arrow to the scene.
Variations – Corner Pinning
A corner-pinner arrow with Extrude enabled and the Drop Shadow parameters adjusted.
Shapes
For a general overview of how to use Callouts, click the Tutorial button in the Viewer in Final Cut Pro X.
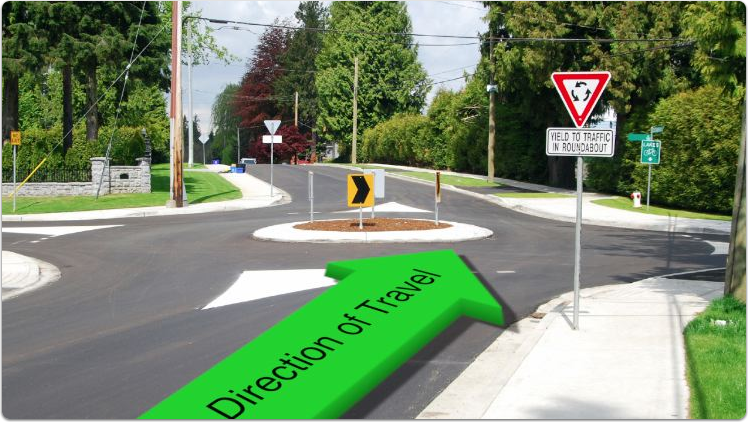
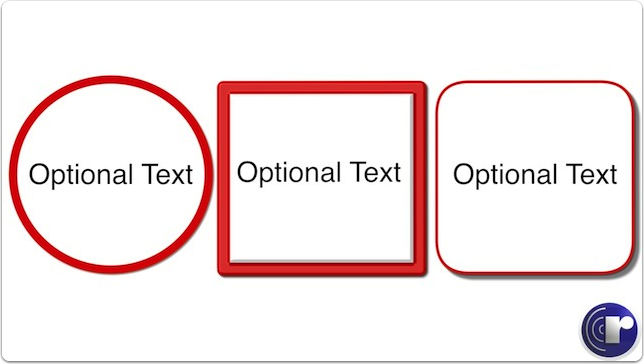
The Shapes Callout lets you add circles, rectangles, and rounded rectangles to your video which you can use to callout an object, frame a drop zone, or simply act as a graphic design background for a title.
On-Screen Controls
Three OSCs: one in the center to move & rotate the Callout and text together (the text will move but not rotate); one to move and rotate just the text; and one to change the scale of the shape.
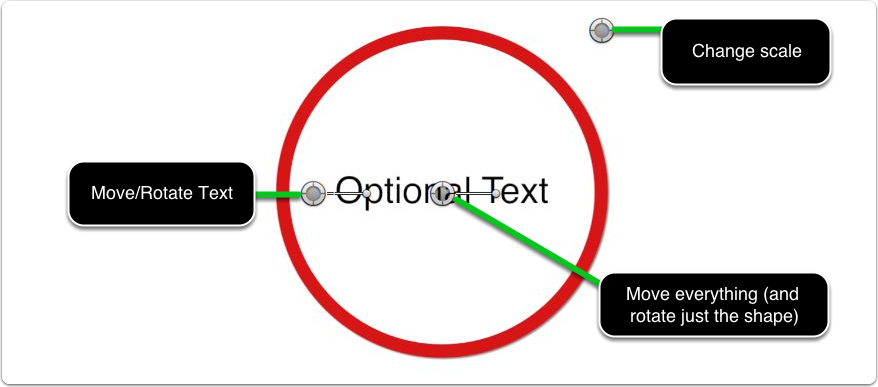
On-Screen Controls
On-Screen Controls Continued
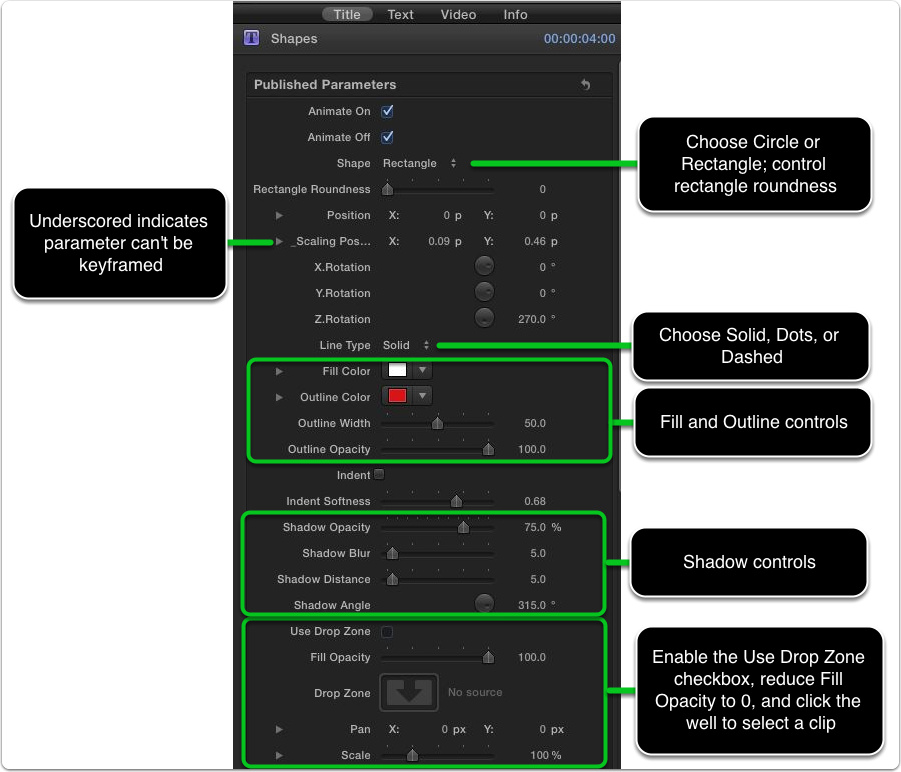
Variations
Some ideas for modifying the default look of the Shapes Callout. Have fun with this one!
Variations – Corner Pinning
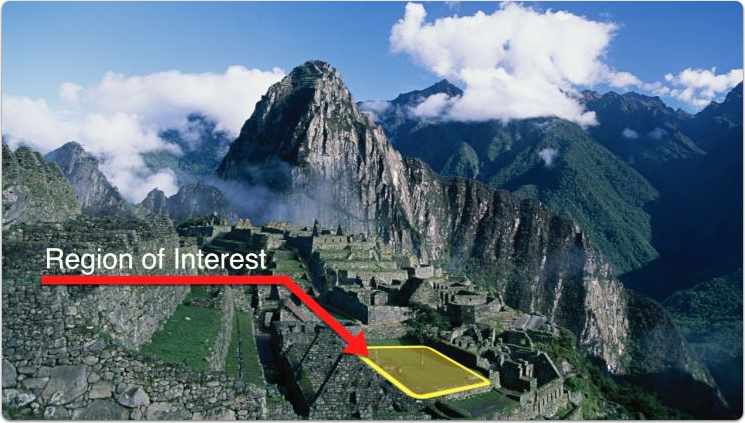
An example of a rounded rectangle shape with 4-Corner enabled and adjusted to match scene perspective. Callout Arrow used to point to the yellow rounded rectangle shape.