Which part of the plugin do you need help with?
Using the Leap Transition
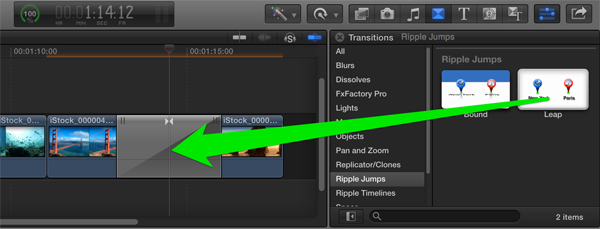
The Leap transition is located in the Transitions Browser in Final Cut Pro X, in the Ripple Jumps category.
Applying the Transition
To apply the Leap transition, drag it to an edit point or first select the edit point where you’d like it applied, then double-click it in the Transitions Browser to apply it.
You will need 2 seconds of extra media on the two clips at the edit point (“handles”) to apply the transition with it’s full default 4-second duration. If you don’t have enough handles, you can slip each clip by pressing the T key for the Trim tool, then dragging right on the outgoing (left) clip, or dragging left on in the incoming (right) clip.

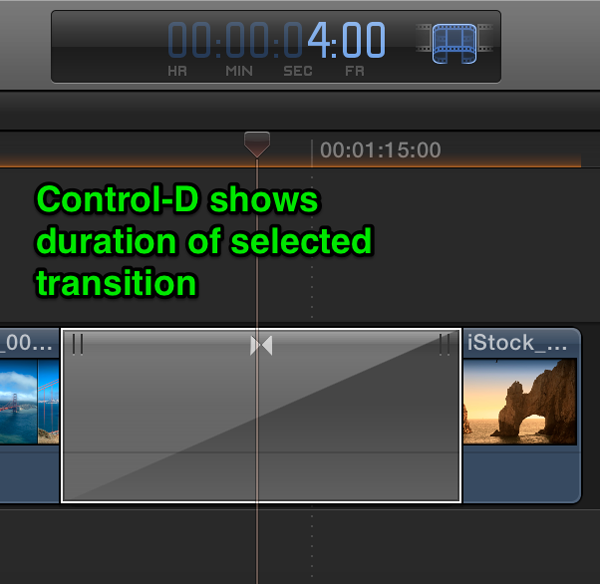
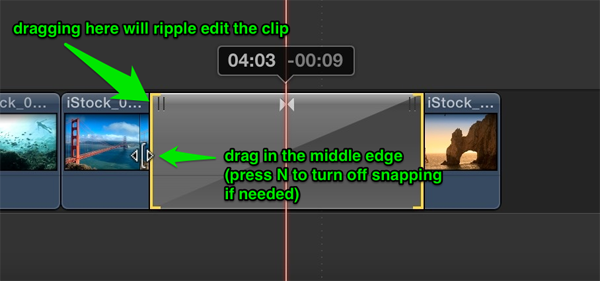
To change the duration of the transition, drag an edge from the middle (dragging a top edge will ripple edit the clip instead), or select the transition, press Control-D to reveal its current duration in the timing display, type a new value, and press return.

Customizing the Transition
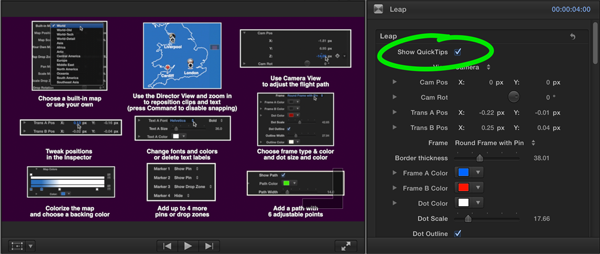
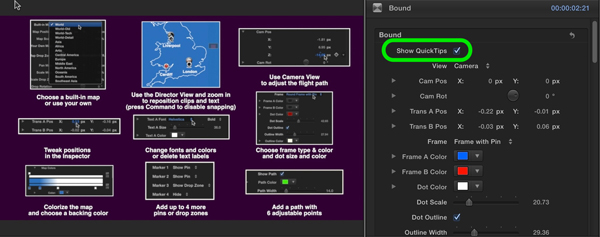
You use the Inspector and the Viewer to customize the transition. Enable Show QuickTips for some basic information on how to use the transition.
Here is a typical 4-step workflow:
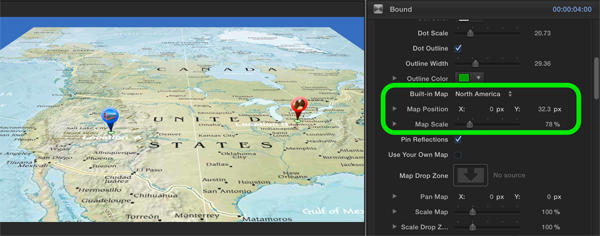
STEP 1: Choose one of the built-in maps from the drop down menu, then adjust its position and scale as needed.
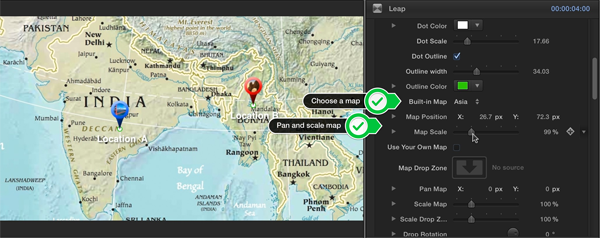
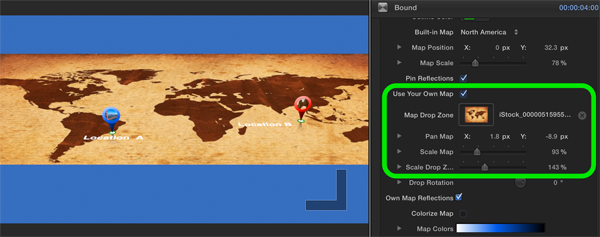
Or, use your own map: click the Use Your Own Map check-box, click the Map Drop Zone well, then select a clip or an image from the Event Library or from the current project. Then use the Pan Map and Scale Map parameters to adjust the view. You can scale the Drop Zone itself independently of the map if needed.
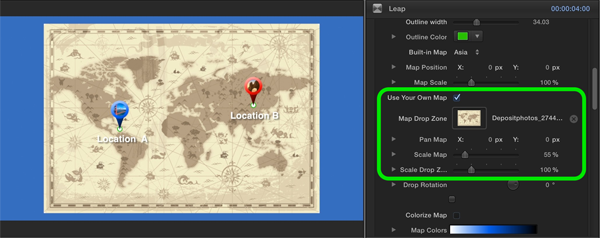
IMPORTANT NOTE: After adding content to a Drop Zone, you need to deselect and then reselect the transition to get the parameters to show up again in the Inspector.
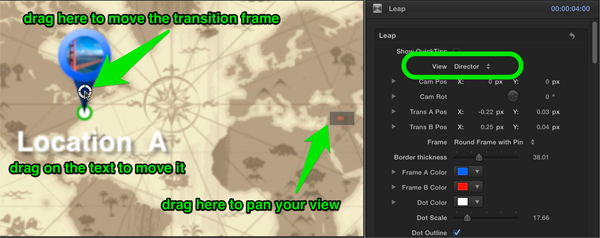
STEP 2: Adjust Positions of Transitions, Markers, and Path
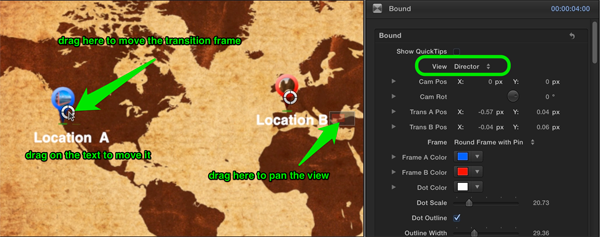
Change the View to Director in order to re-position the Trans A and Trans B pins and titles in the Viewer. Press the Z key for the Zoom tool and then click in the Viewer to zoom in as much as needed to precisely place the pin and the title. Press Shift-Z to fit the image back into the Viewer.
IMPORTANT NOTE: If you need to zoom in more than once, pause between each click. If you double-click accidentally, you’ll select the drop zone instead of zooming in. If this happens, deselect and then re-select the transition.
IMPORTANT NOTE: When dragging in the Viewer, if you find that you are snapping to the yellow guidelines that pop up, hold down the Command key to turn them off.
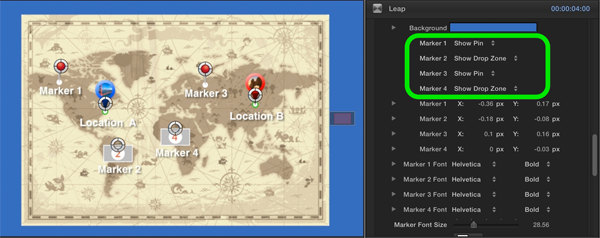
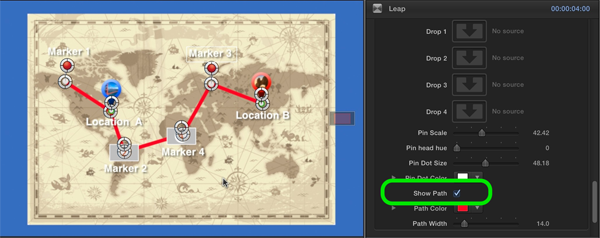
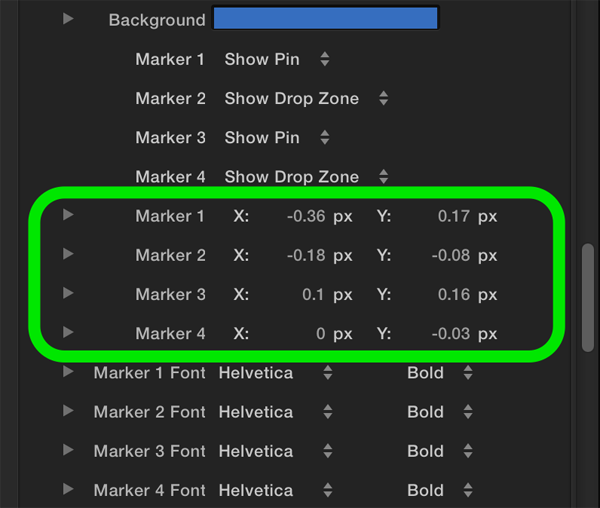
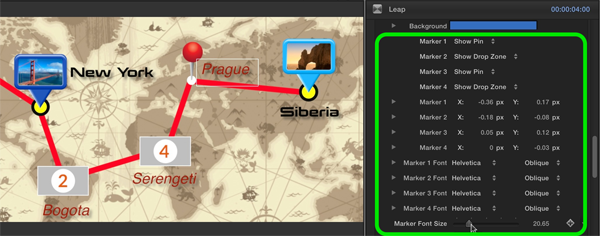
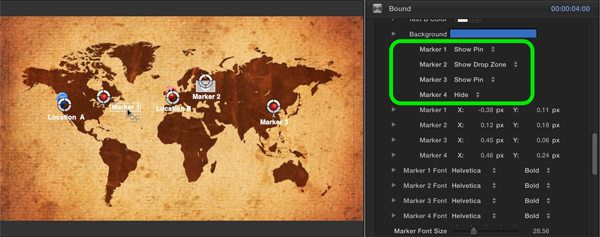
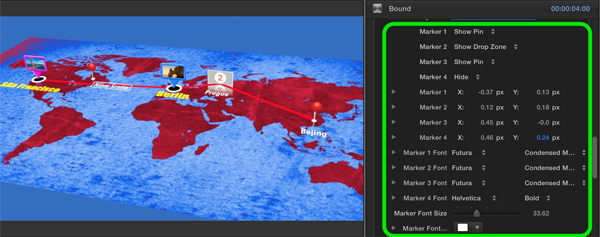
While in the Director view, you can enable up to 4 additional Markers. Each Marker can be either a Pin or a Drop Zone. Each has its own title that can be positioned independently.
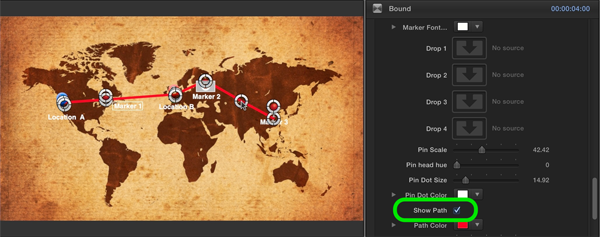
You can also enable an optional Path that has 6 points that can be moved anywhere in the Viewer.
Now click in the text fields to change or delete the titles, press Shift-Z to fit the image back to the Viewer if needed, and switch back to Camera View.
In Camera view, you can still tweak the position of the transitions and the markers using the parameters in the Inspector.

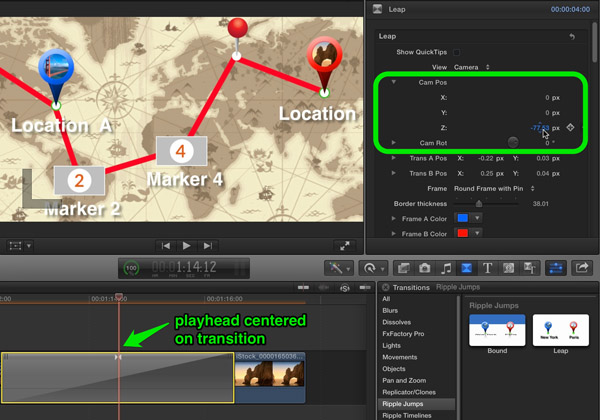
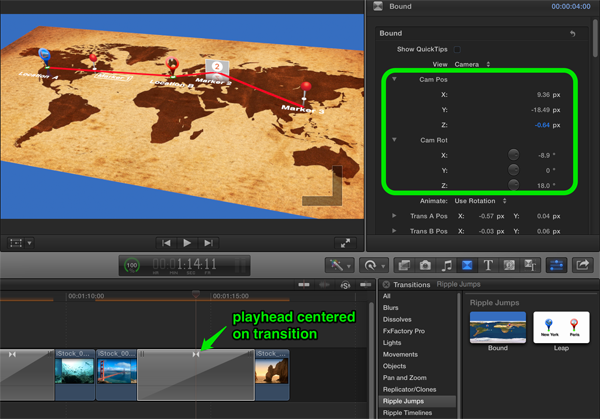
STEP 3: Adjust the Camera Animation
With the playhead in the middle of the transition, use the Cam Pos and Cam Rot parameter to adjust the camera framing of the scene.
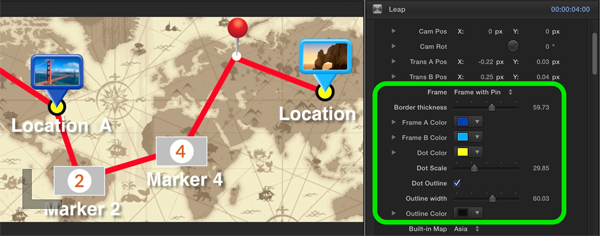
STEP 4: Modify the Style of the Transitions
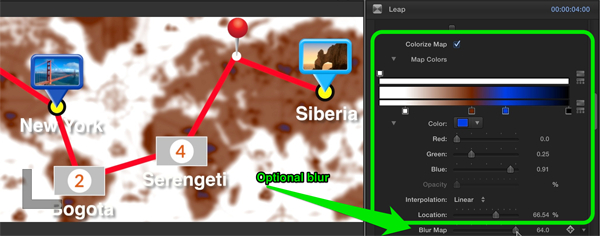
Use the Inspector to select different Frame types. If you chose the Simple Border type, you can adjust the Border thickness. You can change the colors of each frame, the color and size of the dot the frame points to, and the color and thickness of the optional dot outline.
Click the Colorize Map check-box and modify the gradient to apply custom colors to any map, including the built-in maps or your own in the drop zone. Add blur to the map to bring focus to your markers and text. You can keyframe this blur to change over time.
Change the Font, Size, and Color for the Transition A and Transition B titles. Re-position directly in Camera view.
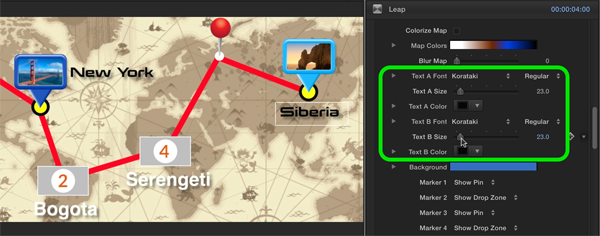
Change the Font, Size, and Color of the Marker titles in the same manner – these parameters are located down below with all the other Marker parameters.
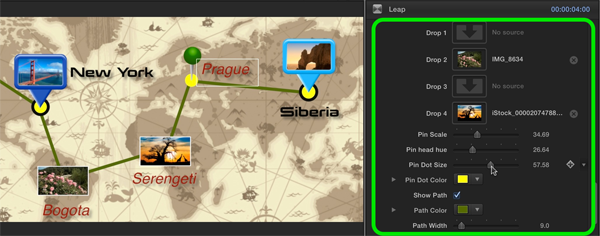
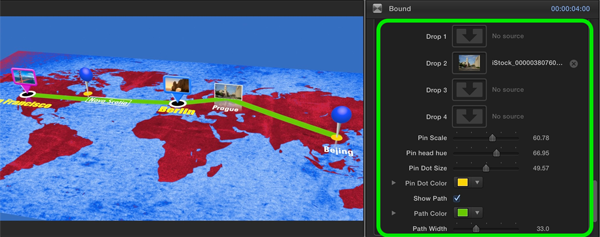
At the bottom of the Inspector you can add content to the Marker drop zones, change the Marker Pin size and color, the Pin dot size and color, the Path color, and finally the Path width.
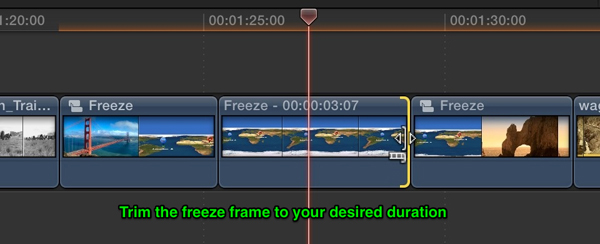
Creating a Freeze Frame
If you want the camera to stop moving after it pulls out to reveal your map, it’s a quick 3-step process to do so:
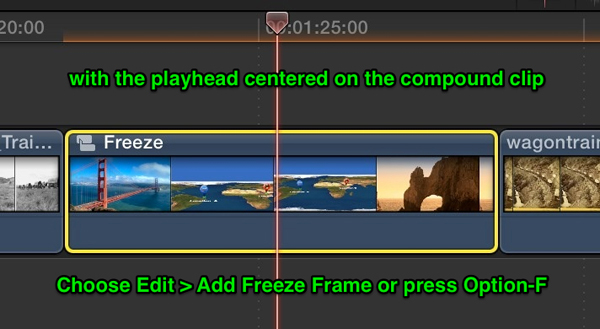
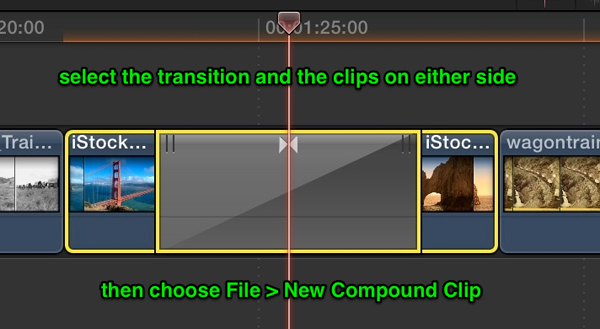
Step 1: Turn the transition into a compound clip. Select the transition and the clips that it’s applied to, then choose File > New Compound Clip or press Option-G.

Step 2: Add the freeze frame. With the playhead centered on the compound clip, choose Edit > Add Freeze Frame or press Option F.
Step 3: Adjust the freeze frame duration. Trim to taste by dragging and edit point or select the freeze frame, press Control-D, and enter the duration you want.

Using the Bound transition
The Bound transition is located in the Transitions Browser in Final Cut Pro X, in the Ripple Jumps Category.
Applying the Transition
To apply the Bound transition, drag it to an edit point or first select the edit point where you’d like it applied, then double-click it in the Transition Browser to apply it.

You will need 2 seconds of extra media on the two clips at the edit point (“handles”) to apply the transition with it’s full default 4-second duration. If you don’t have enough handles, you can slip each clip by pressing the T key for the Trim tool, then dragging right on the outgoing (left) clip, or dragging left on in the incoming (right) clip.

To change the duration of the transition, drag an edge from the middle (dragging a top edge will ripple edit the clip instead), or select the transition, press Control-D to reveal its current duration in the timing display, type a new value, and press return.

Customizing the Transition
You use the Inspector and the Viewer to customize the transition. Enable Show QuickTips for some basic information on how to use the transition.
Here is a typical 4 step workflow:
STEP 1: Choose one of the built-in maps from the drop down menu, then adjust its position and scale as needed.
Or, use your own map: click the Use Your Own Map checkbox, click the Map Drop Zone well, then select a clip or an image from the Event Library or from the current project. Then use the Pan Map and Scale Map parameters to adjust the view. You can scale the Drop Zone itself independently of the map if needed.
IMPORTANT NOTE: After adding content to a Drop Zone, you need to deselect and then reselect the transition to get the parameters to show up again in the Inspector.
STEP 2: Adjust Positions of Transitions, Markers, and Path
Change the View to Director in order to reposition the Trans A and Trans B pins and titles in the Viewer. Press the Z key for the Zoom tool and then click in the Viewer to zoom in as much as needed to precisely place the pin and the title. Press Shift-Z to fit the image back into the Viewer.
IMPORTANT NOTE: If you need to zoom in more than once, pause between each click. If you double-click accidentally, you’ll select the drop zone instead of zooming in. If this happens, deselect and then reselect the transition.
IMPORTANT NOTE: When dragging in the Viewer, if you find that you are snapping to the yellow guidelines that pop up, hold down the Command key to turn them off.
While in the Director view, you can enable up to 4 additional Markers (you can do this in Camera view as well by the way). Each Marker can be either a Pin or a Drop Zone. Each has its own title that can be positioned independently.
You can also enable an optional Path that has 6 points that can be moved anywhere in the Viewer.
Now click in the text fields to change or delete the titles, press Shift-Z to fit the image back to the Viewer if needed, and switch back to Camera View.
In Camera view, you can still tweak the position of the transitions and the markers using the parameters in the Inspector.

STEP 3: Adjust the Camera Animation
With the playhead in the middle of the transition, use the Cam Pos and Cam Rot parameter to adjust the camera framing of the scene.
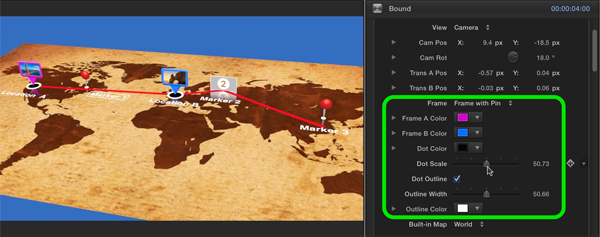
STEP 4: Modify the Style of the Transitions
Use the Inspector to select different Frame types. If you chose the Simple Border type, you can adjust the Border thickness. You can change the colors of each frame, the color and size of the dot the frame points to, and the color and thickness of the optional dot outline.
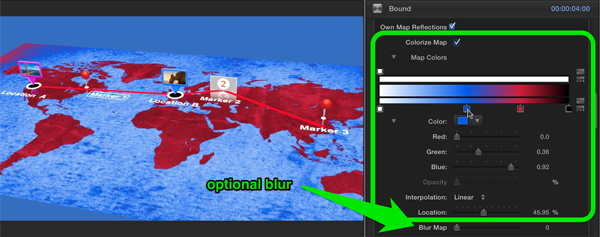
Click the Colorize Map checkbox and modify the gradient to apply custom colors to any map, including the built-in maps or your own in the drop zone. Add blur to the map to bring focus to your markers and text. You can keyframe this blur to change over time.
Change the Font, Size, and Color for the Transition A and Transition B titles. Reposition items directly in Camera view.
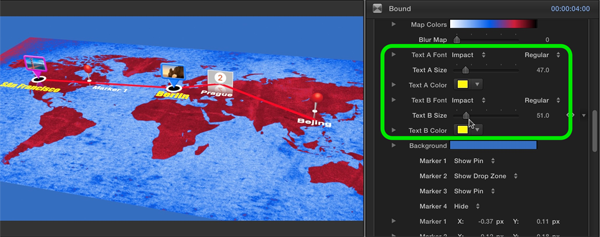
Change the Font, Size, and Color of the Marker titles in the same manner – these parameters are located down below with all the other Marker parameters.
At the bottom of the Inspector you can add content to the Marker drop zones, change the Marker Pin size and color, the Pin dot size and color, the Path color, and finally the Path width.
Creating a Freeze Frame
If you want the camera to stop moving after it pulls out to reveal your map, it’s a quick 3-step process to do so:
Step 1: Turn the transition into a compound clip. Select the transition and the clips that it’s applied to, then choose File > New Compound Clip or press Option-G.
Step 2: Add the freeze frame. With the playhead centered on the compound clip, choose Edit > Add Freeze Frame or press Option F.

Step 3: Adjust the freeze frame duration. Trim to taste by dragging and edit point or select the freeze frame, press Control-D, and enter the duration you want.