Which part of the plugin do you need help with?
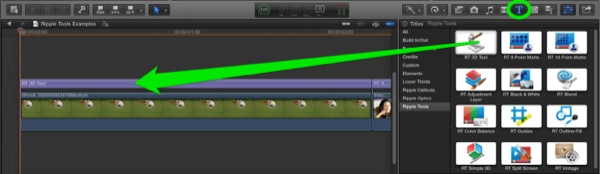
To apply the RT 3D Text effect, drag it from the Titles Browser over the target clip or clips in your project.
If you want the text to exactly match the duration of a single clip, then first make sure the playhead or skimmer is over the clip and press the X key to mark the clip range. Then, select the RT 3D Text thumbnail in the Titles Browser and press the Q key to connect it to the clip range.
Once in the project you can drag on the title to re-position it or drag on either end to trim it. Now, select it, open the Inspector if necessary (Command-4), and select the Title Inspector.
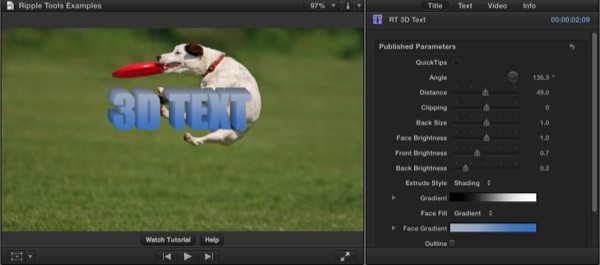
By default, the title reads “3D TEXT” in the Viewer and is shaded with a blue gradient.
Select the purple text bar in the project, double-click on the text in the Viewer, then press Command-A to select it all – then type your own text. Press the Esc key when you are done, then drag the text to re-position it.

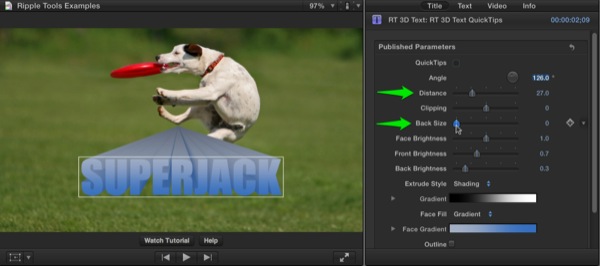
In the Title Inspector, you can change how your text looks, and animate it. Here, I’ve adjusted the Distance and the Back Size to create a perspective effect.
Clicking the disclosure triangle for the Face Gradient reveals the Gradient Editor, where you can change the colors of the face of the text, as well as the extrusion.
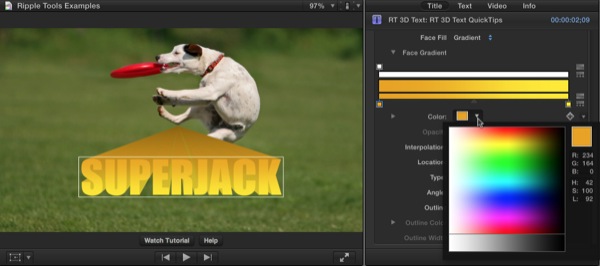
If you want the face to have a single color, simple drag off one of the color tags. Click on the lower thin bar to add more.
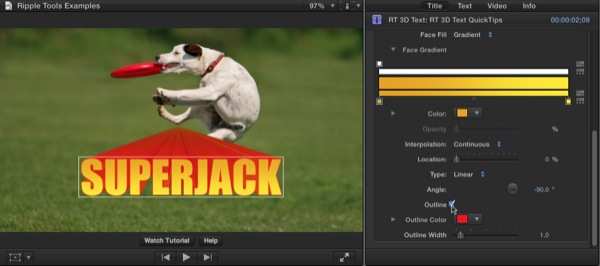
You can add an outline to the effect with the Outline check-box and change its color with the color swatch, but be forewarned that the outline color also gets applied to the extrusion. To avoid this, change the Extrusion Style to Gradient.
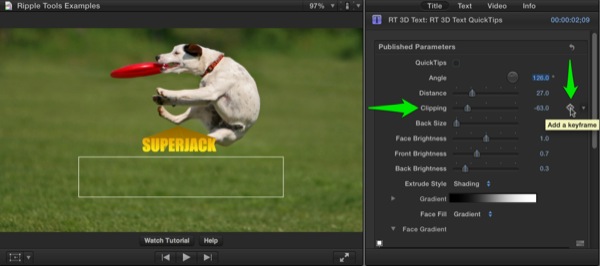
To animate the extrusion, set keyframes for the Clipping parameter.
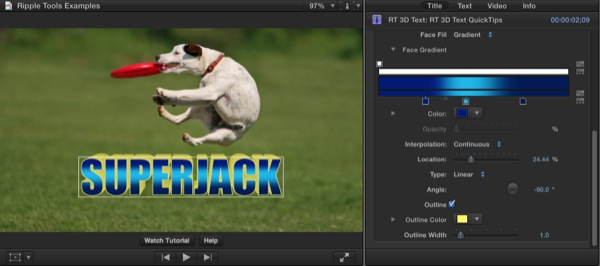
Here’s an example of a gradient with 3 color tags.
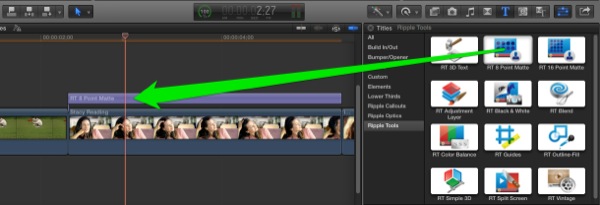
To apply the RT 8 Point Matte effect, drag it from the Titles Browser over the target clip or clips in your project.
If you want the effect to exactly match the duration of a single clip, then first make sure the playhead or skimmer is over the clip and press the X key to mark the clip range. Then, select the RT 8 Point Matte thumbnail in the Titles Browser and press the Q key to connect it to the clip range.
Once in the project you can drag on the title to reposition it or drag on either end to trim it. Now, select it, open the Inspector if necessary (Command-4), and select the Title Inspector.
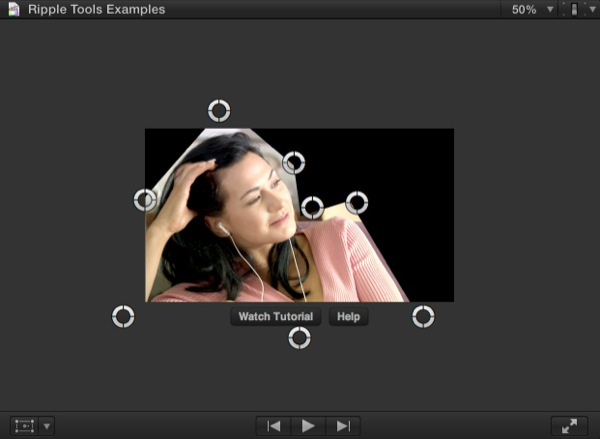
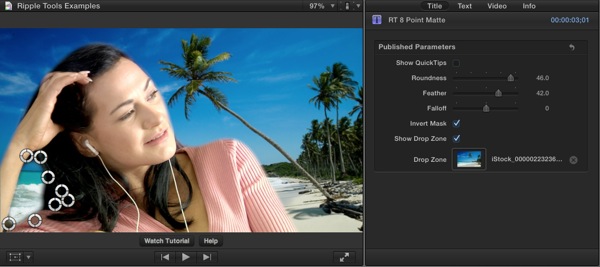
In the Viewer, use the 8 on-screen controls to mask your subject. It may be helpful to zoom out the Viewer so you can see and move off-screen control points. Use the menu at the top right of the Viewer or press Command-”-” (the minus key) when the Viewer is active.
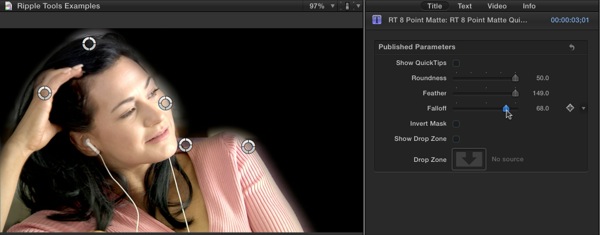
In the Title Inspector, adjust the Roundness, Feather, and Falloff to fine-tune the matte. Here’s a handy tip: the sliders stop at a set value, but you can go higher by dragging directly on the value fields to the right of each slider. For example, you can make the matte much rounder and add much more feather than the sliders might imply.
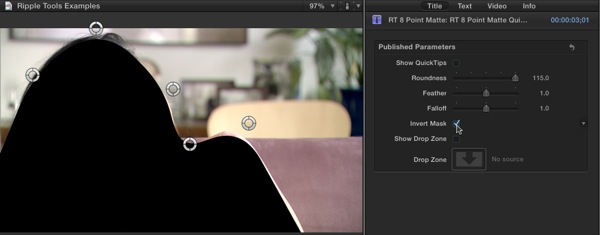
The Invert Matte check-box can help you fine-tune the matte.
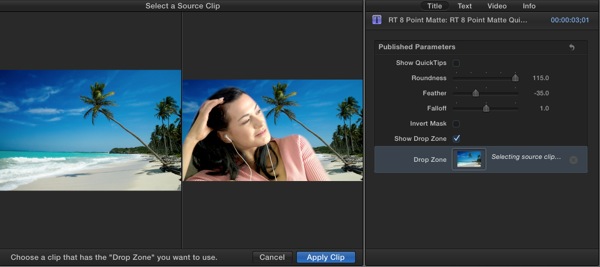
To add a background, click the Show Drop Zone check-box, click the Drop Zone well, then select a clip or image from the Event Browser.
What’s really cool about the 8-point matte is that if you need more points, you can just add another instance of the matte. Just make sure to check the Invert Matte check-box. Here, I’ve used another copy of the matte to cut a hole in the area between the talent’s right arm and her hair.
An important note: unfortunately the 8 and 16 point mattes cannot be animated due to how Final Cut Pro X handles control points. Therefore the best application for these mattes is either on still images or on a freeze frame or a hold frame of a video clip.
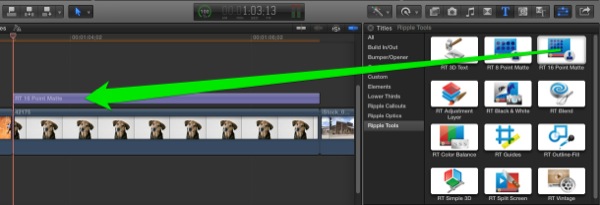
To apply the RT 16 Point Matte effect, drag it from the Titles Browser over the target clip or clips in your project.
If you want the text to exactly match the duration of a single clip, then first make sure the playhead or skimmer is over the clip and press the X key to mark the clip range. Then, select the RT 16 Point Matte thumbnail in the Titles Browser and press the Q key to connect it to the clip range.
Once in the project you can drag on the title to reposition it or drag on either end to trim it. Now, select it, open the Inspector if necessary (Command-4), and select the Title Inspector.
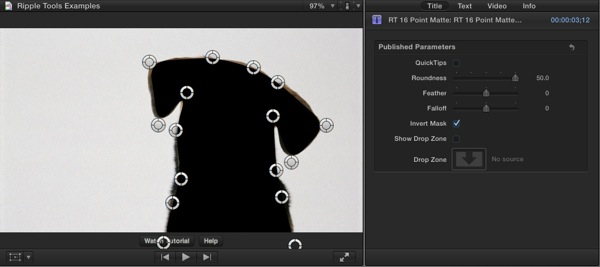
In the Viewer, use the 16 on-screen controls to mask your subject. It may be helpful to zoom out the Viewer so you can see and move off-screen control points. Use the menu at the top right of the Viewer or press Command-”-” (the minus key) when the Viewer is active.
In the Title Inspector, adjust the Roundness, Feather, and Falloff to fine-tune the matte. Here’s a handy tip: the sliders stop at a set value, but you can go higher by dragging directly on the value fields to the right of each slider. For example, you can make the matte much rounder and add much more feather than the sliders might imply.

The Invert Matte checkbox can help you fine-tune the matte. To add a background, click the Show Drop Zone checkbox, click the Drop Zone well, then select a clip or image from the Event Browser.

What’s really cool about the 8 and 16-point mattes is that if you need more points, you can just add another instance of the either one. Just make sure to check the Invert Matte checkbox. Here, I’ve used a copy of the 8 Point Matte to add more detail to the dog’s ear.

An important note: unfortunately the 8 and 16 point mattes cannot be animated due to how Final Cut Pro X handles control points. Therefore the best application for these mattes is either on still images or on a freeze frame or a hold frame of a video clip.
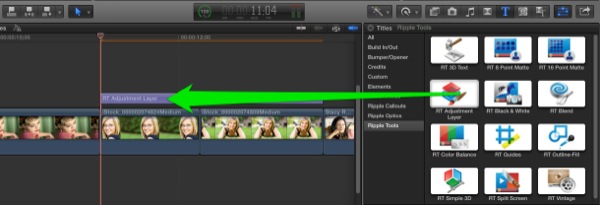
To apply the RT Adjustment Layer effect, drag it from the Titles Browser over the target clip or clips in your project.
If you want the effect to exactly match the duration of a single clip, then first make sure the playhead or skimmer is over the clip and press the X key to mark the clip range. Then, select the Adjustment Layer thumbnail in the Titles Browser and press the Q key to connect it to the clip range.
Once in the project you can drag on the title to reposition it or drag on either end to trim it. Now, select it, open the Inspector if necessary (Command-4), and select the Title Inspector.
The RT Adjustment Layer has no effect on your clip by default. Think of it as a “container” for effects. Rather than applying color corrections, video effects, or transformations directly to a video clip, you apply them to the RT Adjustment Layer instead. By doing so, your change will affect ALL clips underneath the Adjustment layer. Plus, it’s super-easy to disable – just tap the V key.
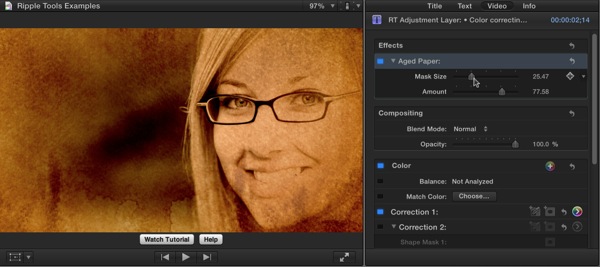
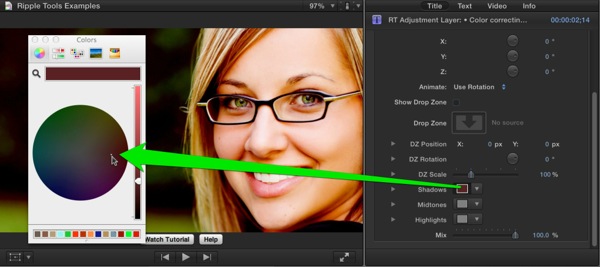
Here, I’ve made a color correction to the RT Adjustment Layer, which has affected the clip underneath.
Adding Effects from the Effects Browser will also affect any and all clips beneath.
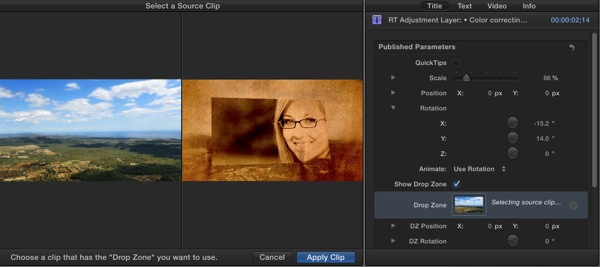
If you transform the RT Adjustment Layer, for example by changing its scale, you can then add a background by checking the Show Drop Zone checkbox, clicking the well, and selecting a clip from the Event Browser. Note than any color corrections or effects will be applied to this background as well. If needed, use the controls to adjust the position, rotation, and scale of the Drop Zone.
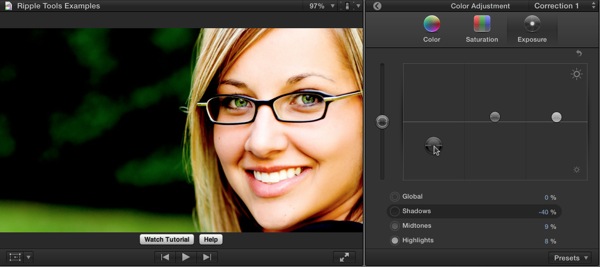
A cool feature of the RT Adjustment Layer effect is that it includes built-in color correction tools that you can use instead of the Color Board. Just click each of the color swatches for Shadows, Midtones, and Highlights to set hue, saturation, and brightness for that range.
You can dial back the impact of your color correction with the Mix parameter.
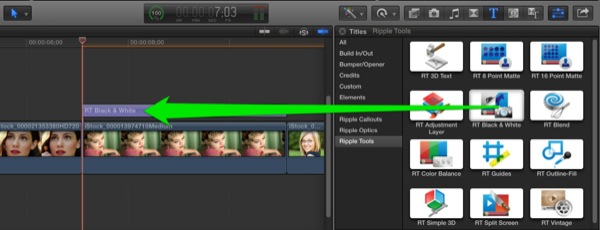
To apply the RT Black & White effect, drag it from the Titles Browser over the target clip or clips in your project.
If you want the effect to exactly match the duration of a single clip, then first make sure the playhead or skimmer is over the clip and press the X key to mark the clip range. Then, select the Black & White thumbnail in the Titles Browser and press the Q key to connect it to the clip range.
Once in the project you can drag on the title to reposition it or drag on either end to trim it. Now, select it, open the Inspector if necessary (Command-4), and select the Title Inspector.
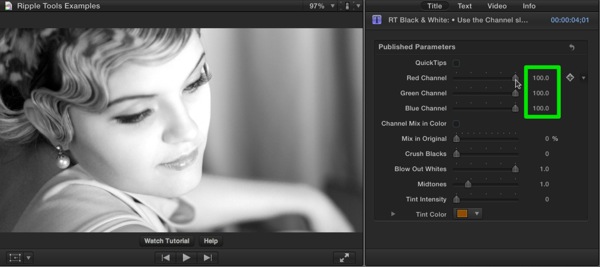
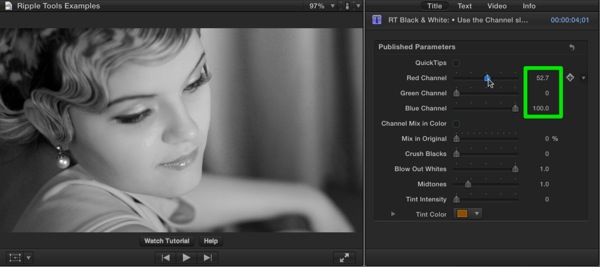
The RT Black & White effect gives you a great deal of creative control over how the color image is converted to black and white by manipulating the mix of color channels. By default, all color channels are used.
By adjusting the color channel sliders, you can create different black and white results. For example, here I’ve removed the Red channel entirely – notice the talent’s skin and lips.
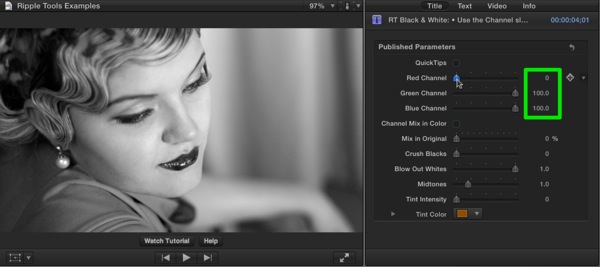
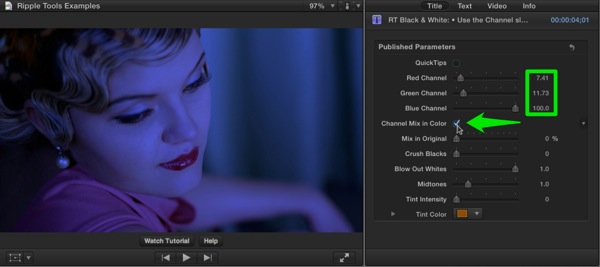
Here, I’ve reduced the Red channel to about half, and removed the Green channel completely. Your results will vary greatly depending on the shot, so experiment.
By enabling the Channel Mix in Color checkbox, you can see how the color channels are combining – you can even use it to create a “day for night” effect.
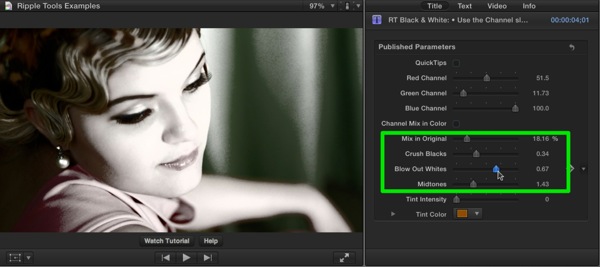
You can add some of the original color back in with the Mix in Original parameter. Increase contrast with the Crush Blacks, Blow Out Whites and Midtones parameters. Here’s an example.
Finally, you can tint your shot with any color, and modulate the intensity of the tint.
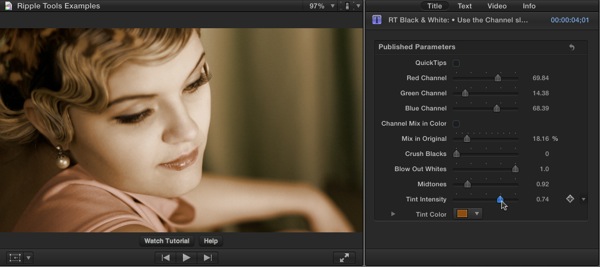
By manipulating these parameters, you can create quite unique looks.
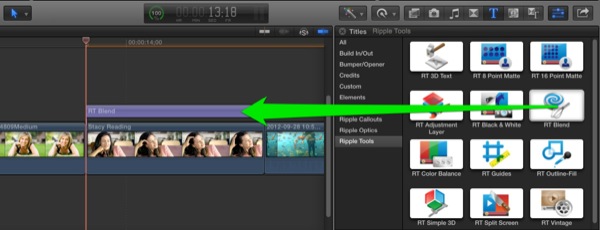
To apply the RT Blend effect, drag it from the Titles Browser over the target clip or clips in your project.
If you want the effect to exactly match the duration of a single clip, then first make sure the playhead or skimmer is over the clip and press the X key to mark the clip range. Then, select the Blend thumbnail in the Titles Browser and press the Q key to connect it to the clip range.
Once in the project you can drag on the title to reposition it or drag on either end to trim it. Now, select it, open the Inspector if necessary (Command-4), and select the Title Inspector.
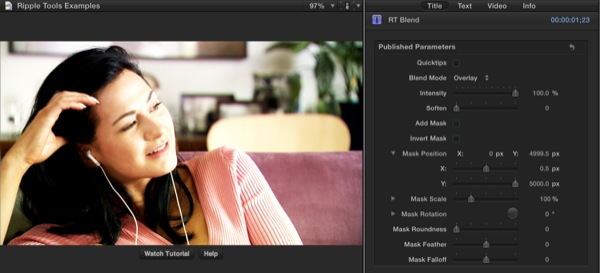
RT Blend applies a blend mode to a copy of your clip on top of itself. By default the blend mode is Overlay, but you should try out different options.
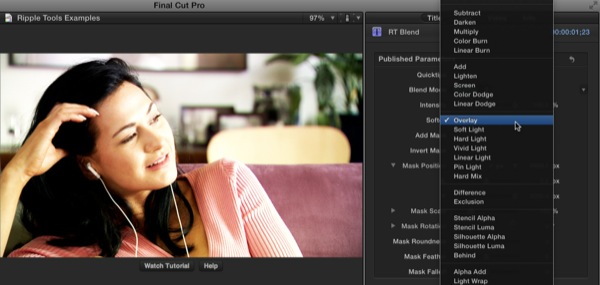
If you have a dark, muddy clip, try Add or Screen to lighten it up. If you have a washed out clip, try Multiply. Overlay and Soft Light are often pleasing.
The Soften parameter adds in some blur for a soft hazy effect. Here I’ve used Hard Light and cranked Softness all the way up.

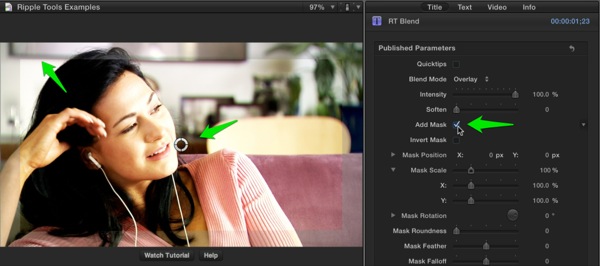
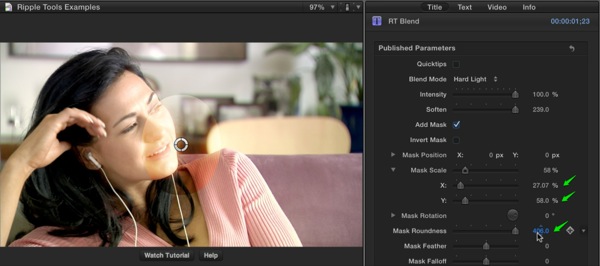
You can also limit your “look” to a specific area of the frame by checking the Add Mask checkbox, which reveals a rectangular mask and an on-screen control for positioning the mask.
Here, I’ve changed the mask’s Scale and Roundness to better match the talent’s face. Important tip: you can go much further than the sliders allow by dragging directly on the value fields.
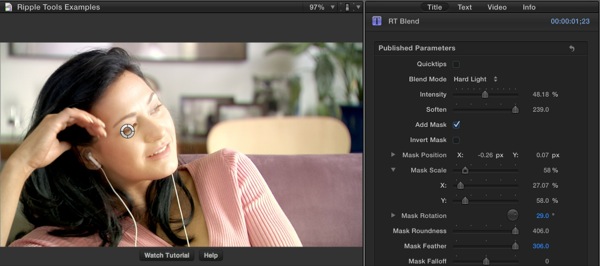
Here’s the mask positioned over the talent’s face with the feather cranked up to ease the transition.
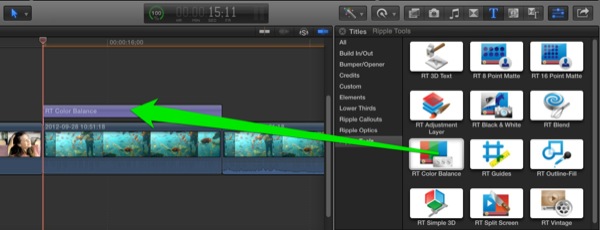
To apply the RT Color Balance effect, drag it from the Titles Browser over the target clip or clips in your project.
If you want the effect to exactly match the duration of a single clip, then first make sure the playhead or skimmer is over the clip and press the X key to mark the clip range. Then, select the Color Balance thumbnail in the Titles Browser and press the Q key to connect it to the clip range.
Once in the project you can drag on the title to reposition it or drag on either end to trim it. Now, select it, open the Inspector if necessary (Command-4), and select the Title Inspector.
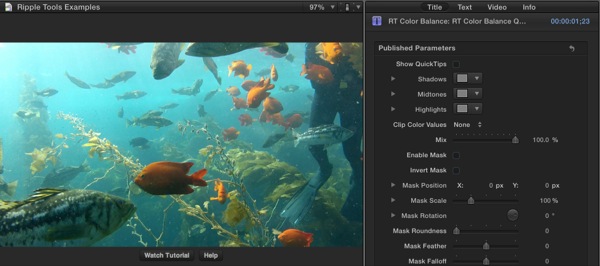
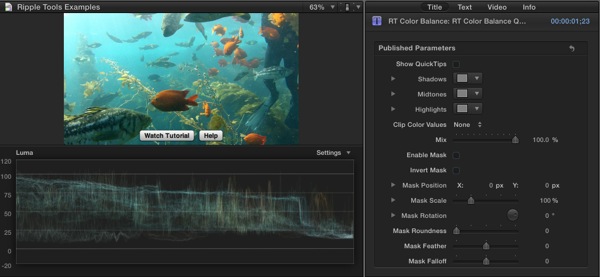
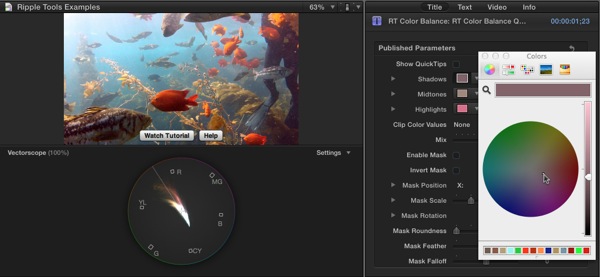
RT Color Balance lets you color correct a shot using traditional color wheels. It can be helpful to use the Video Scopes while correcting your shot (Window > Viewer Display > Show Video Scopes or Command-7). Here, I’ve selected the Waveform displayed beneath the shot.
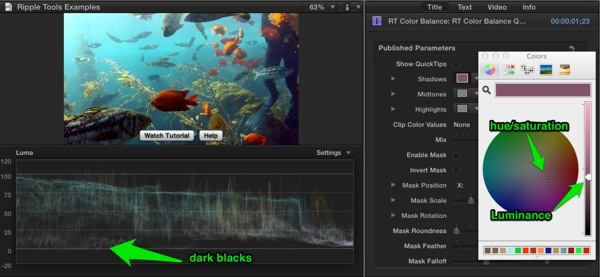
I’ll click the grey (meaning neutral) color swatch for the Shadow, then warm them up, and use the vertical slider to make sure I have some dark, rich blacks.
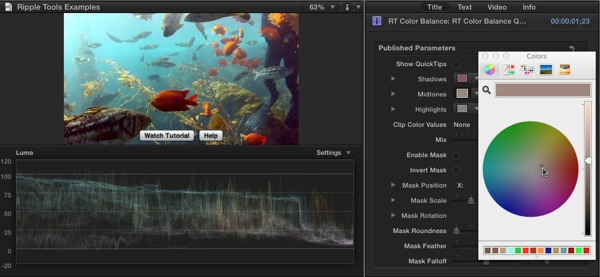
Next, I’ll select the Midtones swatch and warm the shot there as well.
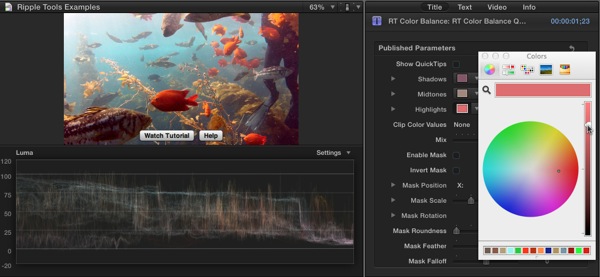
Finally I’ll adjust the Highlights, once again warming things up. As you work, keep a careful eye on the waveform – making changes to hue and saturation in the color wheel can have a big impact on luminance values.
Finally, I’ll switch to the Vectorscope to check and adjust saturation levels.
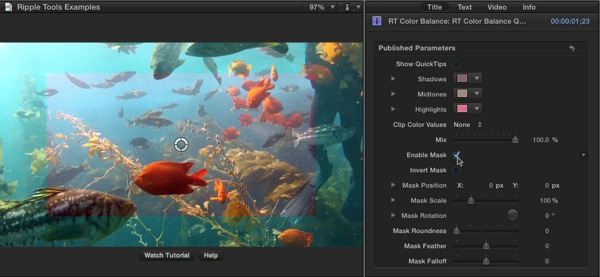
You can limit your corrections to a specific area of the frame by clicking the Enable Mask checkbox. Doing so creates a default rectangular mask and reveals an on-screen control for adjusting the mask position.
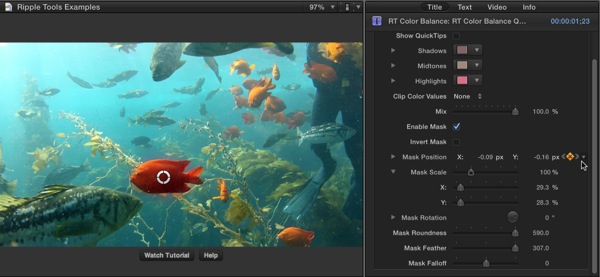
You can adjust the position, scale, and rotation of the mask, and even animate it to follow an object by setting keyframes. Here, I’ve restricted my color correction to the large orange fish in the foreground.
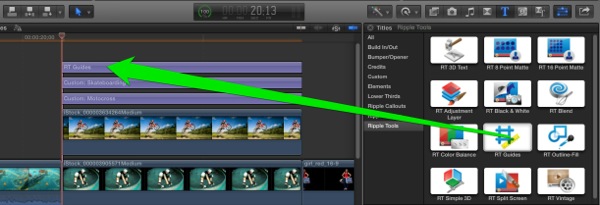
To apply the RT Guides effect, drag it from the Titles Browser over the target clip or clips in your project.
If you want the effect to exactly match the duration of a single clip, then first make sure the playhead or skimmer is over the clip and press the X key to mark the clip range. Then, select the Guides thumbnail in the Titles Browser and press the Q key to connect it to the clip range.
Once in the project you can drag on the title to reposition it or drag on either end to trim it. Now, select it, open the Inspector if necessary (Command-4), and select the Title Inspector.
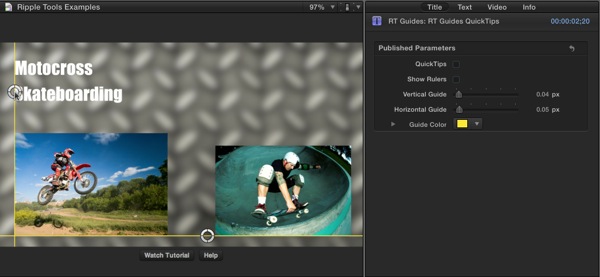
One vertical and one horizontal yellow guide appear in the viewer with on-screen controls for moving them. If the on-screen control is over an object, you can simply slide it along the guide.
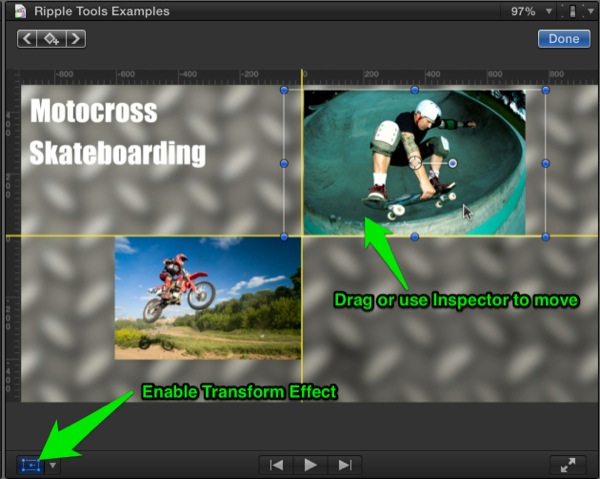
To align text objects to the guides, just select them in the Project, then drag them in the Viewer. To align video clips, select each one, enable the Transform effect, and drag them in the Viewer or use the Inspector.
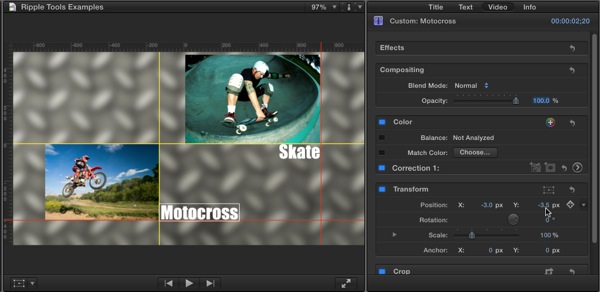
If you want additional guides, simple add another copy. You can change colors in the Title Inspector. Sometimes dragging text in the Viewer is hampered by snapping – below, I’m using the Inspector to align the text.
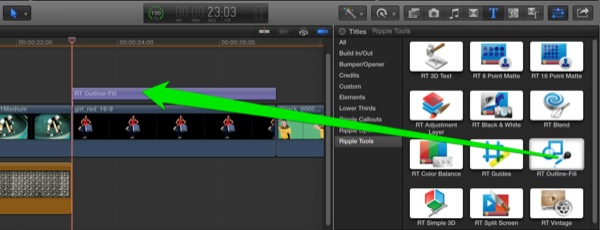
To apply the RT Outline-Fill effect, drag it from the Titles Browser over the target clip or clips in your project.
If you want the effect to exactly match the duration of a single clip, then first make sure the playhead or skimmer is over the clip and press the X key to mark the clip range. Then, select the RT Outline-Fill thumbnail in the Titles Browser and press the Q key to connect it to the clip range.
Once in the project you can drag on the title to reposition it or drag on either end to trim it. Now, select it, open the Inspector if necessary (Command-4), and select the Title Inspector.
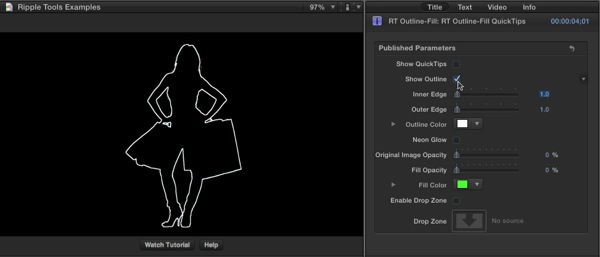
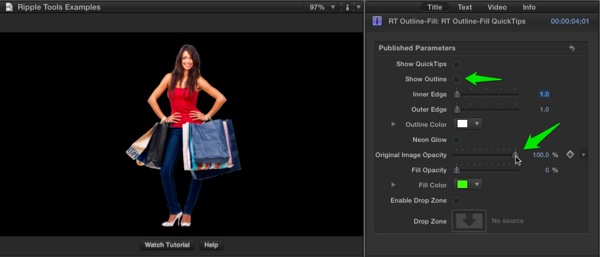
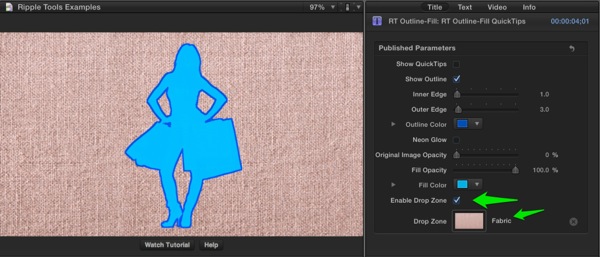
By default, the RT Outline-Fill effect automatically creates a thin white outline around any object that is on a transparent background. To see the original object, you can uncheck the Show Outline checkbox and set the Original Image Opacity to 100%.
The effect only works on images or video clips that have transparency. The above is a still image in the .png format. Other still image formats that support transparency include .tiff and .psd.
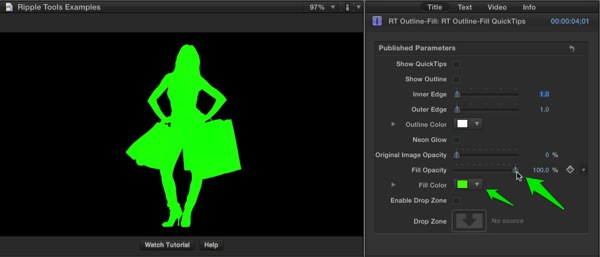
Instead of an outline, you can choose to fill the object with a solid color.
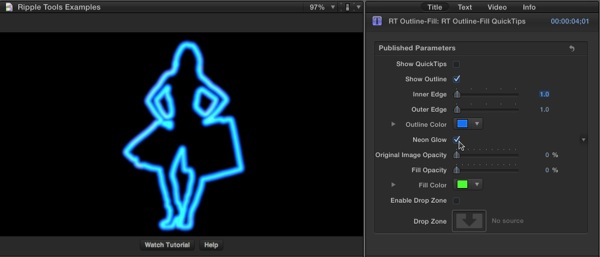
Or, if you are using the outline, you can enable the Neon Glow checkbox.
To add a background, click the Enable Drop Zone checkbox, click the Drop Zone well, and select a clip from the Event Browser.
Here’s a tip: if you want to use a generator for a background, one way is to get it into an Event so you can add it to the Drop Zone well. To do so, add it to your project, then make a compound clip out of it (File > New Compound Clip).
The RT Outline-Fill effect also works on subjects shot against a blue or green screen (or anything that can be keyed out).
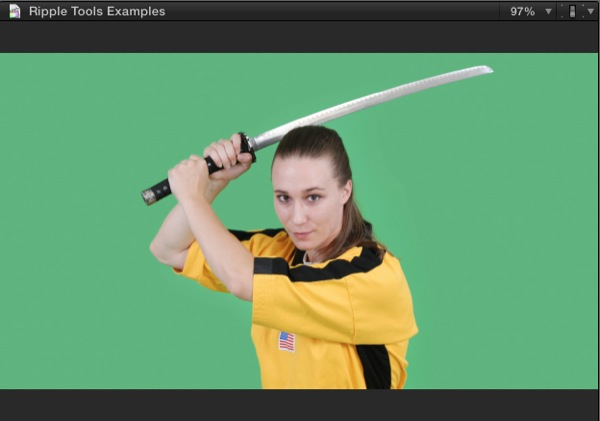
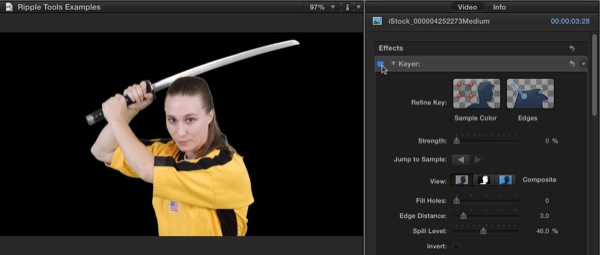
For the RT Outline-Fill effect to work, you first need to remove the background with the Keyer effect.
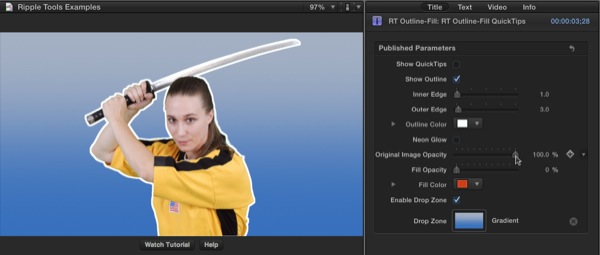
Then apply the RT Outline-Fill effect. Here, I’ve set the Original Image Opacity to 100% and used a gradient generator for a background.
To apply the RT Simple 3D effect, drag it from the Titles Browser over the target clip or clips in your project.
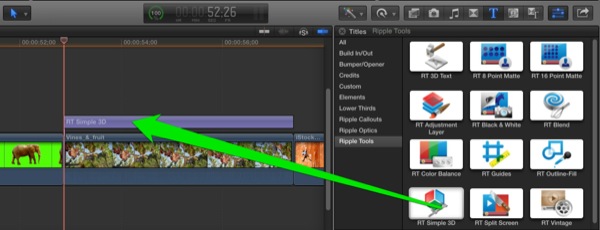
If you want the effect to exactly match the duration of a single clip, then first make sure the playhead or skimmer is over the clip and press the X key to mark the clip range. Then, select the RT Simple 3D thumbnail in the Titles Browser and press the Q key to connect it to the clip range.
Once in the project you can drag on the title to reposition it or drag on either end to trim it. Now, select it, open the Inspector if necessary (Command-4), and select the Title Inspector.
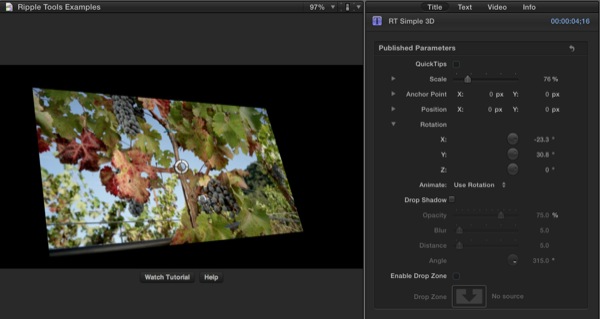
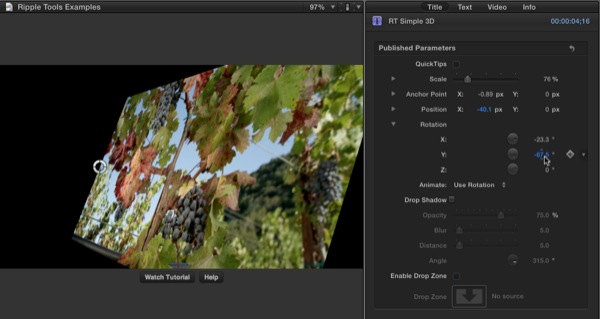
By default, the RT Simple 3D effect scales the clip down and rotates it on both the X and Y axes slightly so that you can see how the effect works. The on-screen control in the center of the Viewer represents the Anchor Point of the clip – this is the point around which the clip scales and rotates. If you want the clip to rotate around its center point, just leave it as is. If you want the clip to rotate around an edge (like a door or a laptop screen) then you can reposition the control to the edge of the clip.
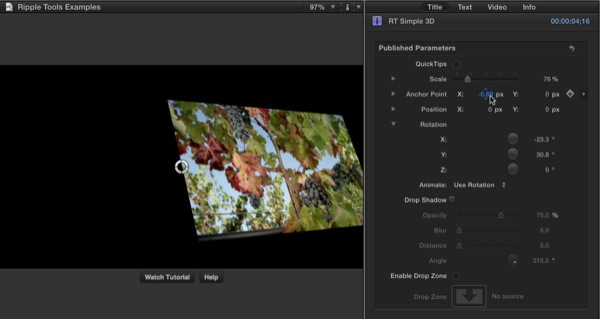
The on-screen control is very touchy! If you prefer, use the Anchor Point X and Y parameters in the Inspector instead. As you adjust it, you’ll notice it stays in the center of the Viewer and the clip moves. Therefore, once you get it where you want, use the Position X and Y parameters to recenter the clip as you like.
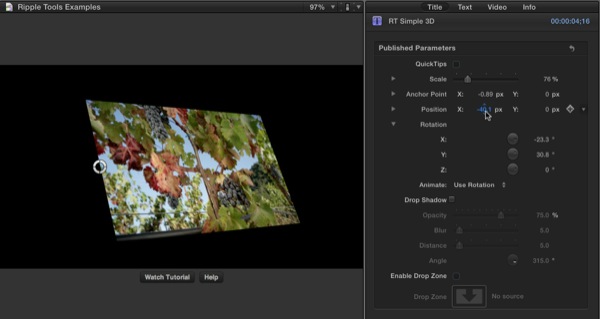
You can now rotate the clip around the anchor point in X, Y, and/or Z. By setting keyframes, you can animate the rotation (as well as position and scale).
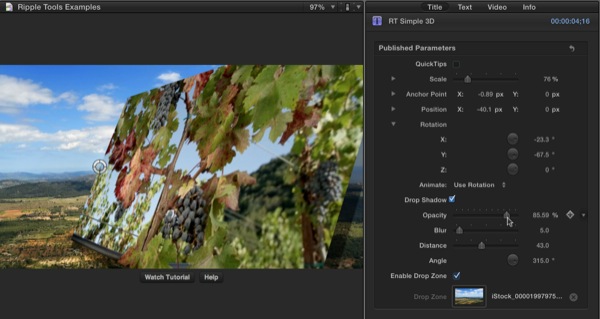
Check the Enable Drop Zone checkbox, click the Drop Zone well, and select a clip in the Event Browser for a background.
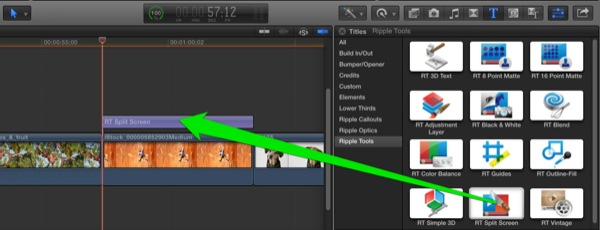
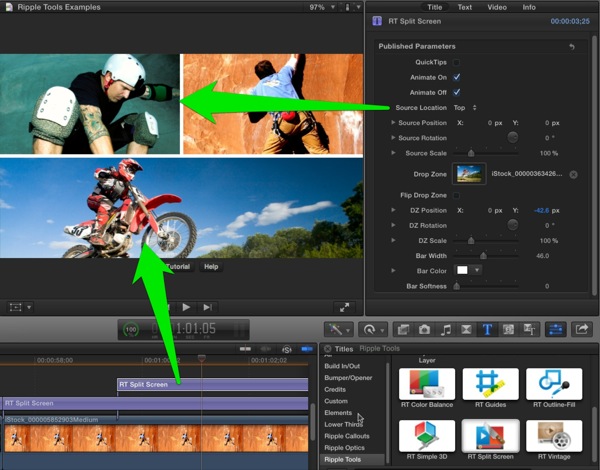
To apply the RT Split Screen effect, drag it from the Titles Browser over the target clip or clips in your project.
If you want the effect to exactly match the duration of a single clip, then first make sure the playhead or skimmer is over the clip and press the X key to mark the clip range. Then, select the RT Split Screen thumbnail in the Titles Browser and press the Q key to connect it to the clip range.
Once in the project you can drag on the title to reposition it or drag on either end to trim it. Now, select it, open the Inspector if necessary (Command-4), and select the Title Inspector.
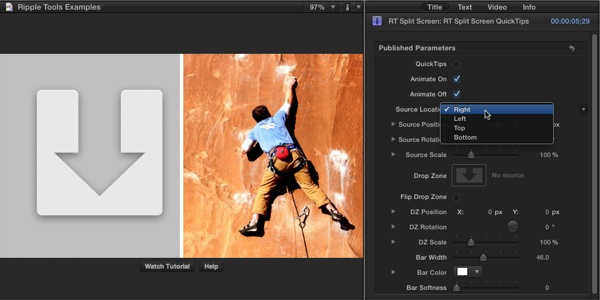
By default, the RT Split Screen effect animates onto and off the screen, but you can disable either animation with the checkboxes at the top of the Title Inspector.
Chose the location of the timeline clip using the Source Location pop-up menu (the timeline clip is the “Source”).
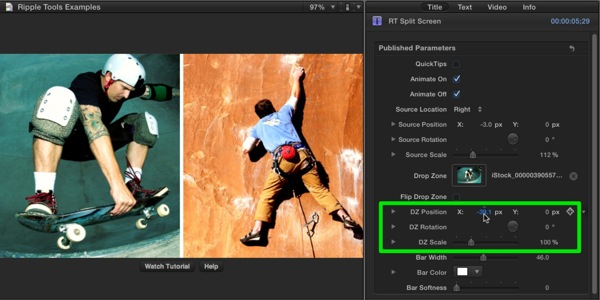
Click the Drop Zone well and select an Event Browser clip for the other side of the split screen. Double-click the drop zone clip to adjust it directly in the Viewer, or use the DZ Position, Rotation, and Scale parameters in the Inspector.
What’s really cool about the RT Split Screen effect is that you can add more splits by adding another copy on top in a staircase-like fashion. The first split becomes the new “Source.”
You can change the color and thickness of the separator bar and make it soft as well.
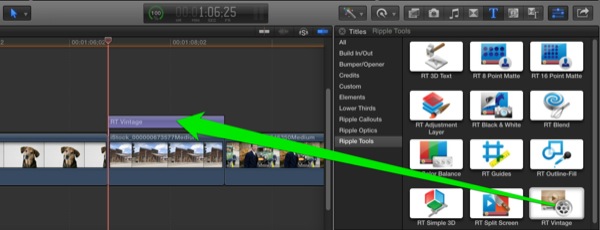
To apply the RT Vintage effect, drag it from the Titles Browser over the target clip or clips in your project.
If you want the effect to exactly match the duration of a single clip, then first make sure the playhead or skimmer is over the clip and press the X key to mark the clip range. Then, select the RT Vintage thumbnail in the Titles Browser and press the Q key to connect it to the clip range.
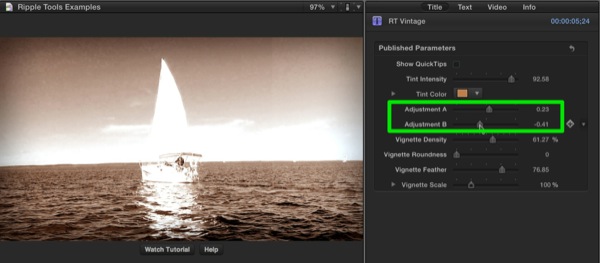
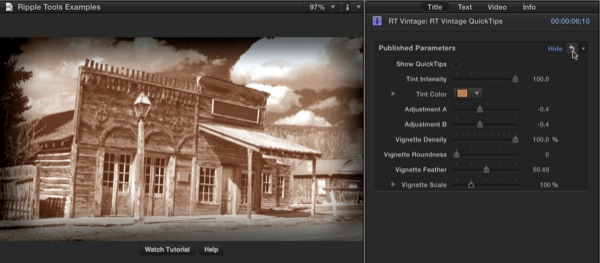
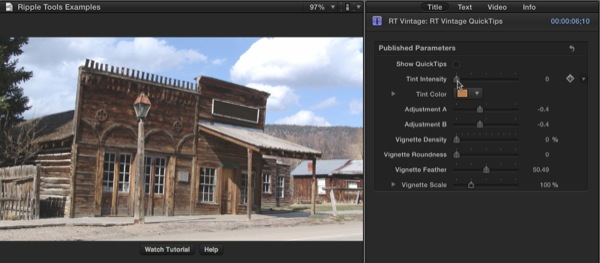
Once in the project you can drag on the title to reposition it or drag on either end to trim it. Now, select it, open the Inspector if necessary (Command-4), and select the Title Inspector. By default, the RT Vintage effect applies a sepia tint with a vignette.
Below, I’ve lowered the Tint Intensity to 0 and the Vintage Density to 0 so you can see what the original unaltered clip looks like.
You can change the Tint Color and adjust the Vignette – like many parameters, dragging directly on the value field will allow you to set values beyond the slider range.

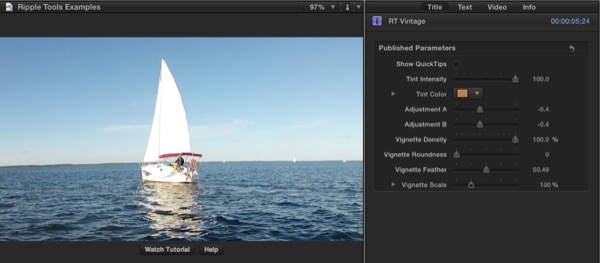
For some images, the default settings may not look very good. Here’s an image with the RT Vignette effect disabled by pressing the “V” key.
And here it is with the default settings.
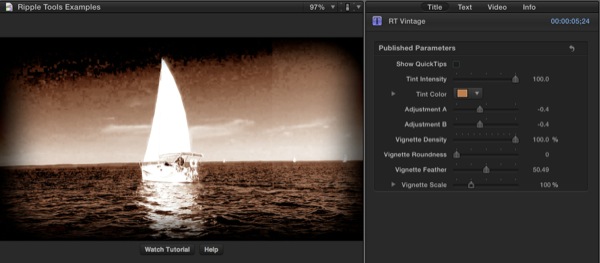
To fix an image like this, use the Adjustment parameters.